Commission calculation based on Product, Product category, Agent
Manage the commission based on Product Sell Price, Product Profit Margin.
Manage the commission payment.
How to use
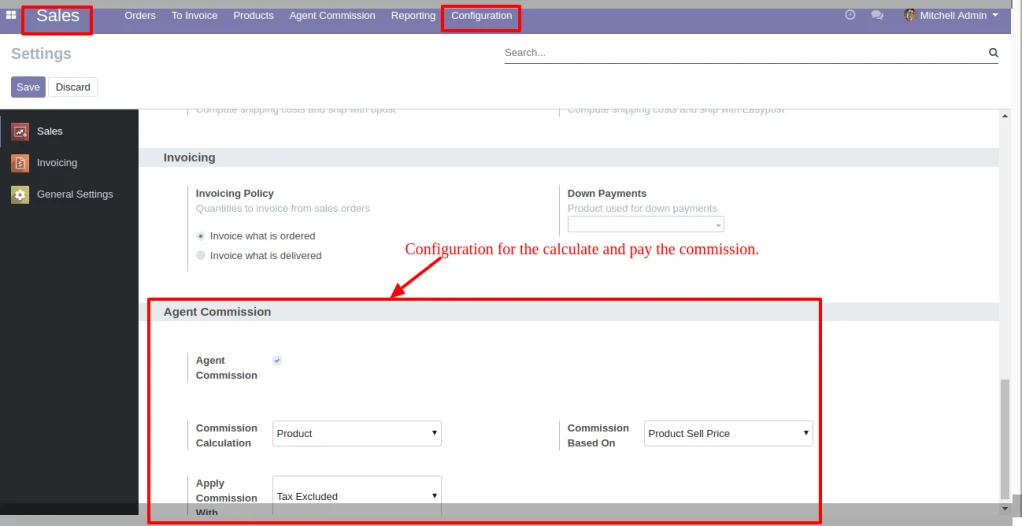
In Sales > Configuration, under the Agent Commission, set the option for Commission Calculation, Commission Based on and Apply Commission With. Based on this configuration the commission is calculate and paid.
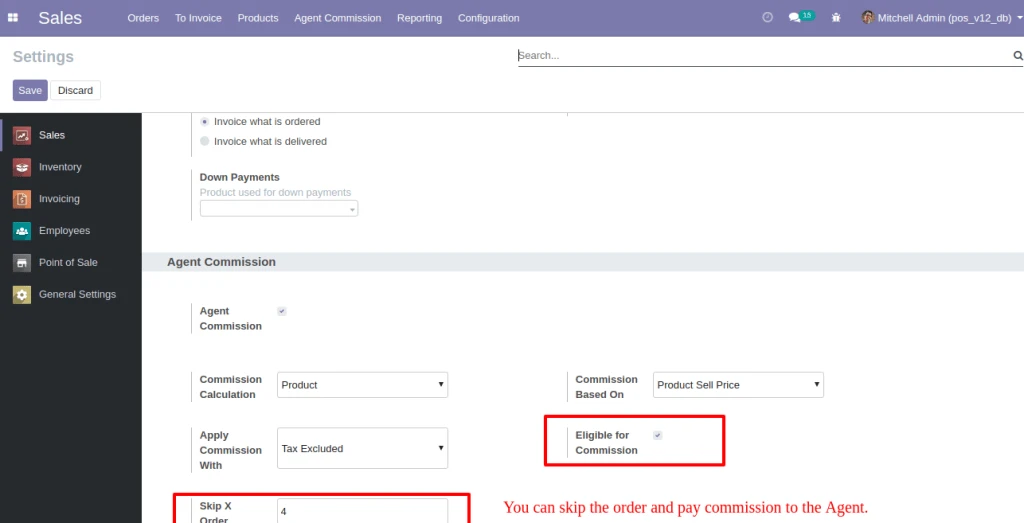
User can set the order that you want to skip. Based on this configuration the commission is calculate and paid.
Sale Configuration Skip Order
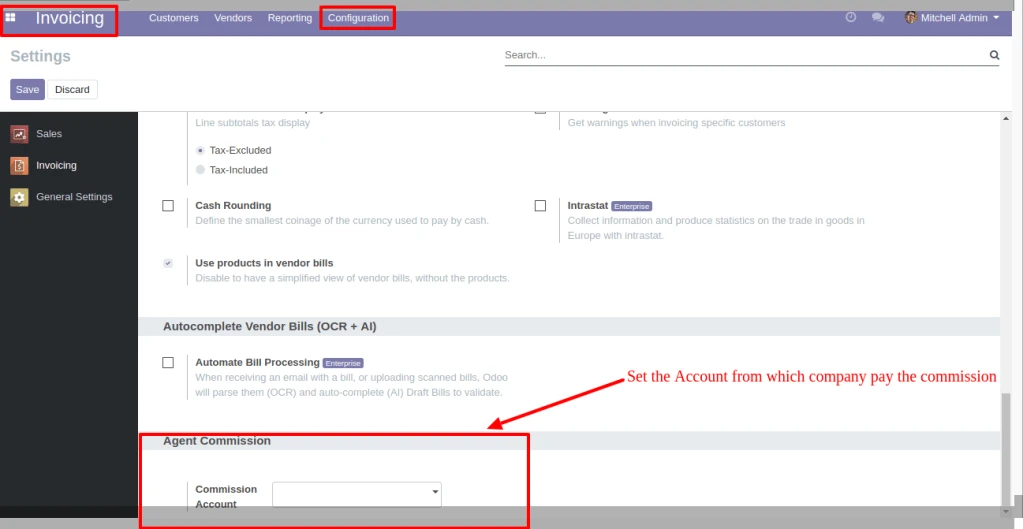
In Invoicing > Configuration, under the Agent Commission, set the option for Commission Account. Based on this configuration the commission is paid.
Invoice Configuration
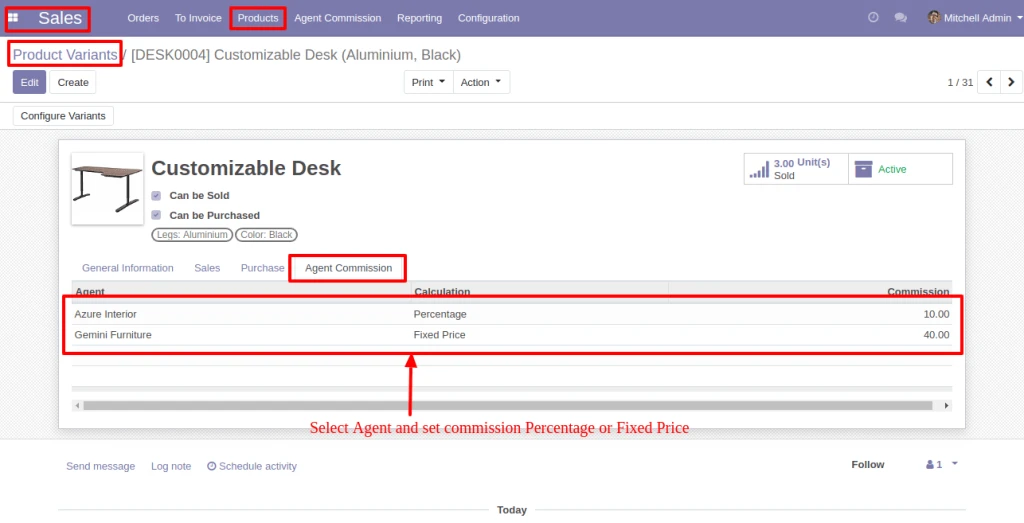
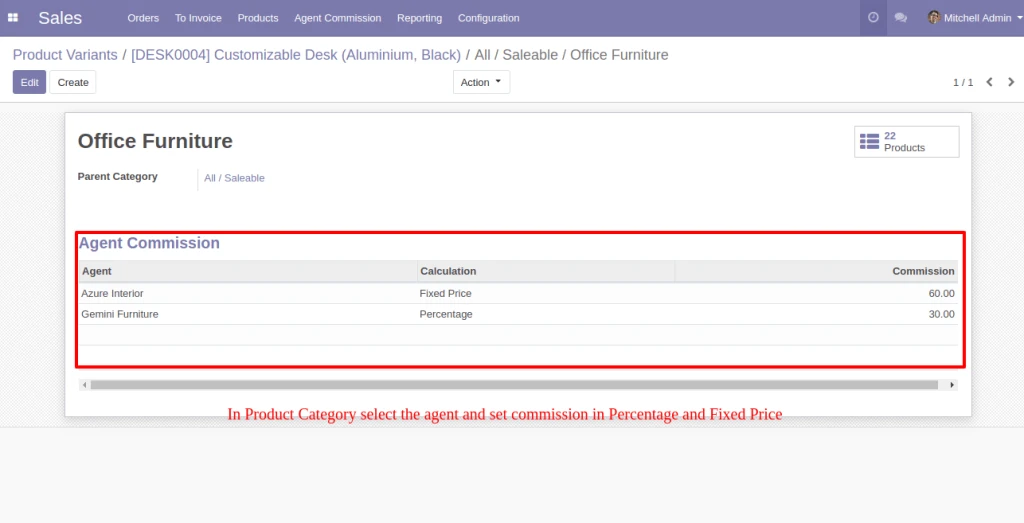
In Products, below the Agent Commission tab, select the Agent and set Compute Price as Fixed price or Percentage. The same configuration is also available in the Product Category and Customer.
If Agent is selected in Sale Order, he will be eligible for commission as per the Configuration.
Product Variant
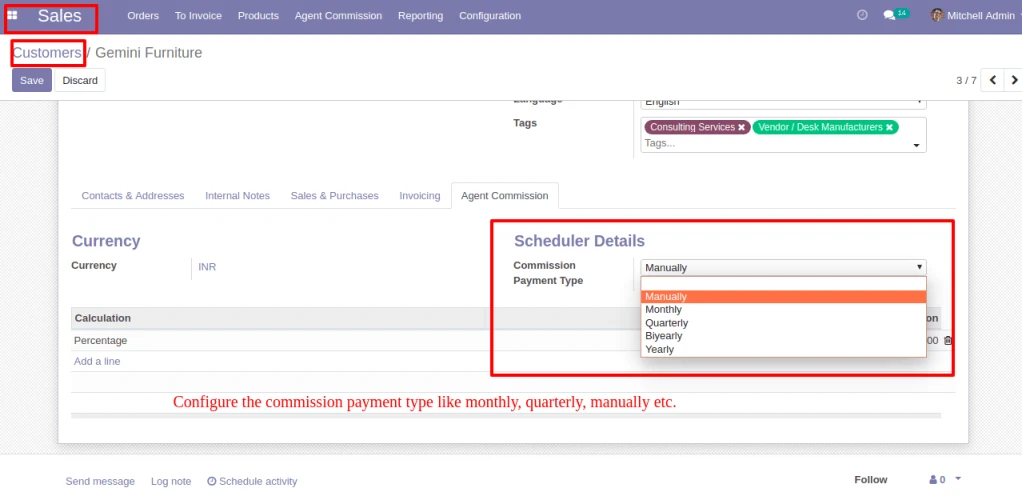
In Customer > Agent Commission, Configure the Commission Payment type like monthly, quarterly, manually etc.
Payment Type
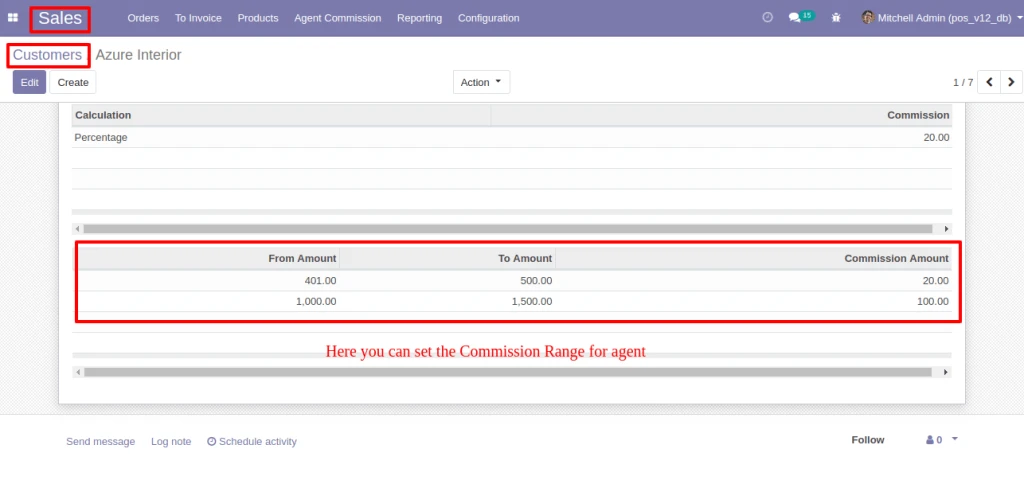
In Customer > Agent Commission, Configure the Commission Range, If Sale Order amount is between the range then Agent get commission which is configured.
Commission Range
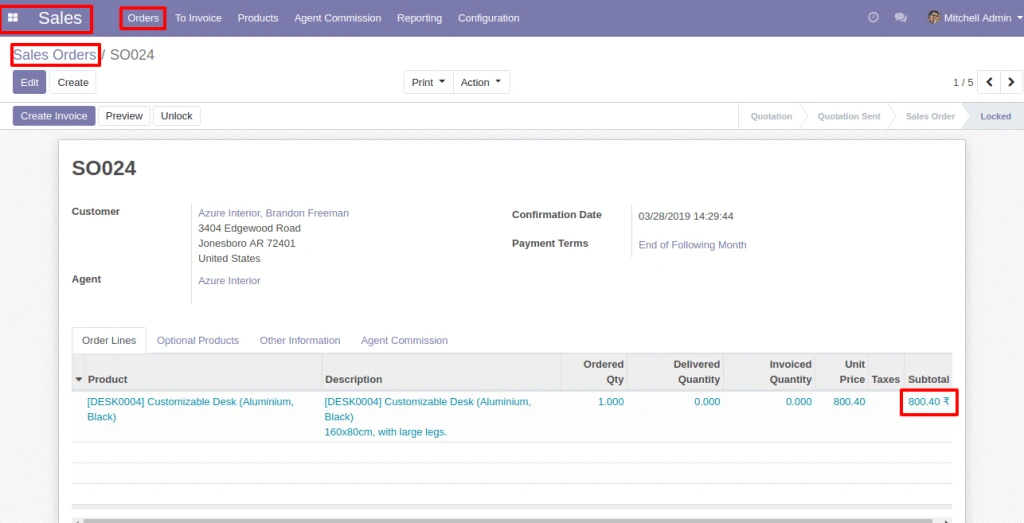
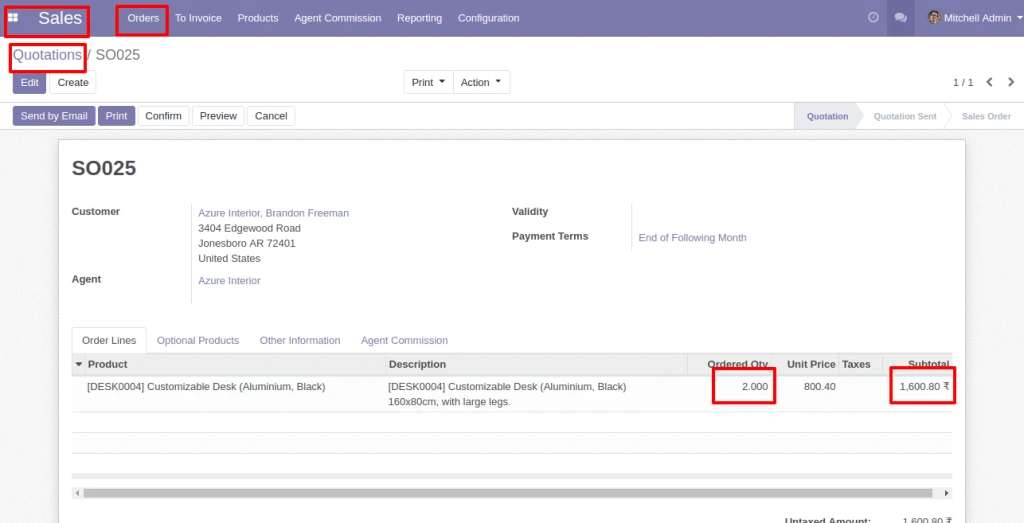
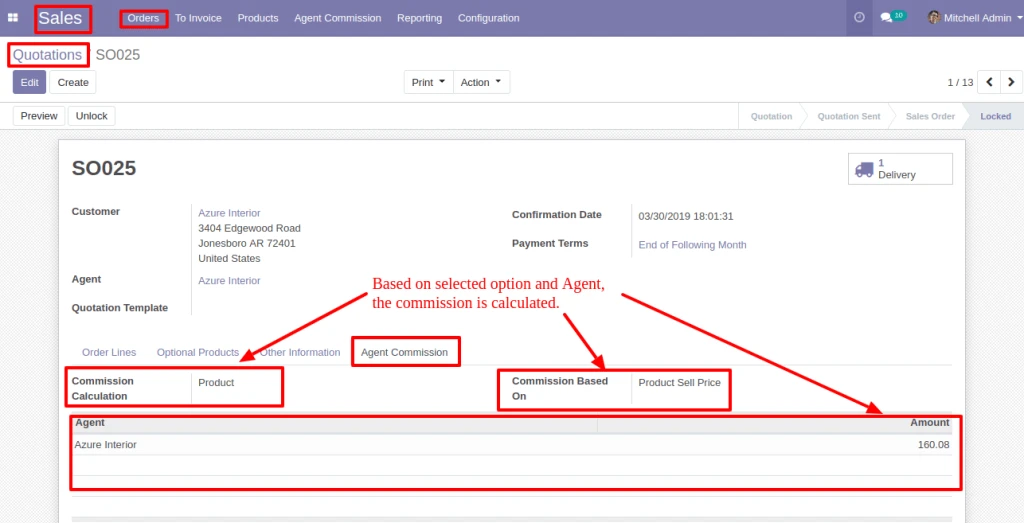
In Sale Order, below the Agent Commission tab, based on the Agent and commission calculation option, Commission is calculated.
Sale Order
If commission is based on ‘Product/Product Category/Agent’, Commission will be calculated for each Order Lines.
Product CategoryProduct CategorySale Order Commission
Note : If Commission is based on ‘Product/Product Category’, Commission will be calculated as per quantity for each order line.
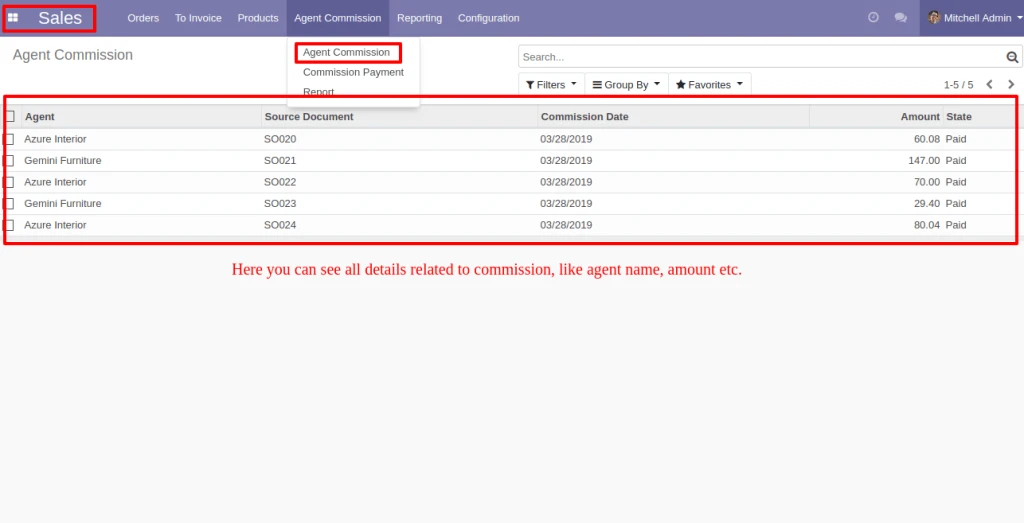
Into Agent Commission menu, you can see the Commission detail.
Agent Commission Details
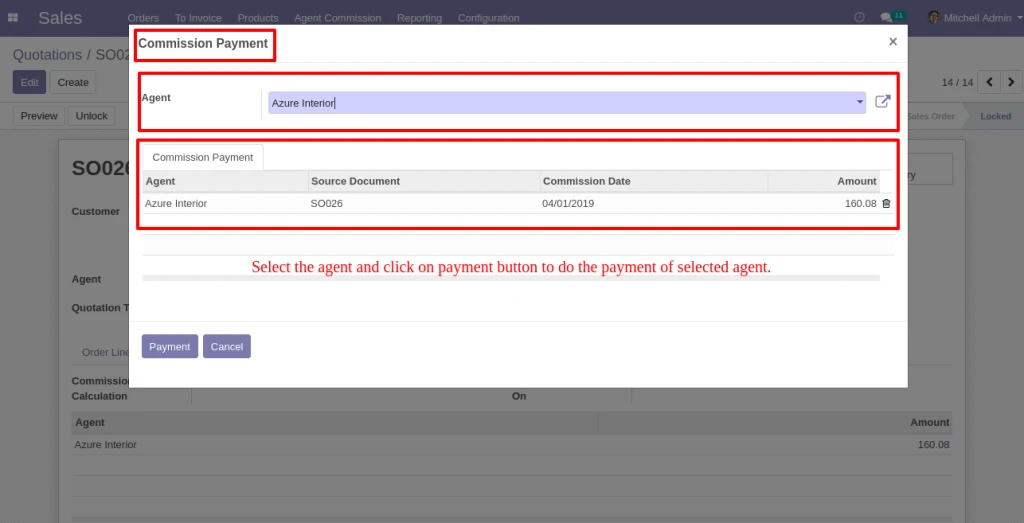
By Clicking on the Commission Payment, Vendor Bill can be generated by filterring Commission records.
Agent Payment
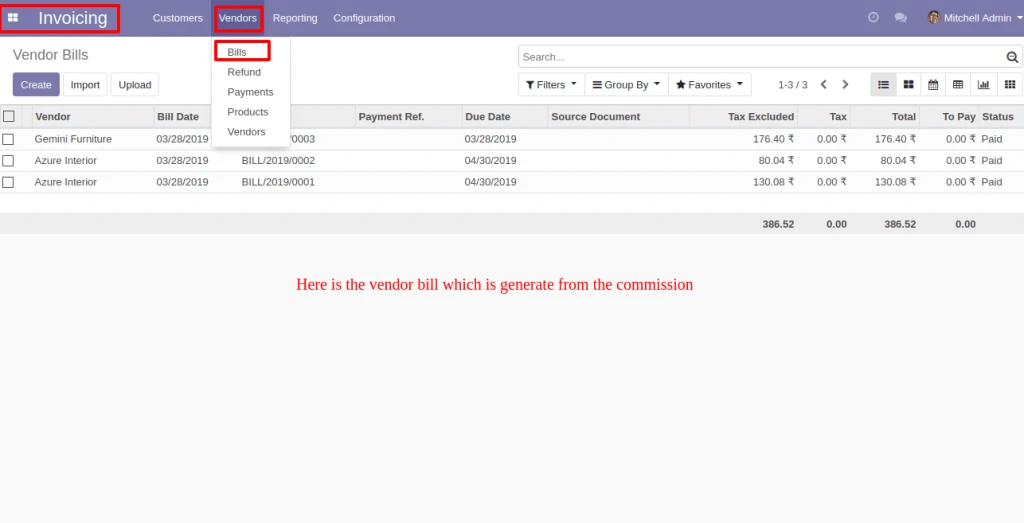
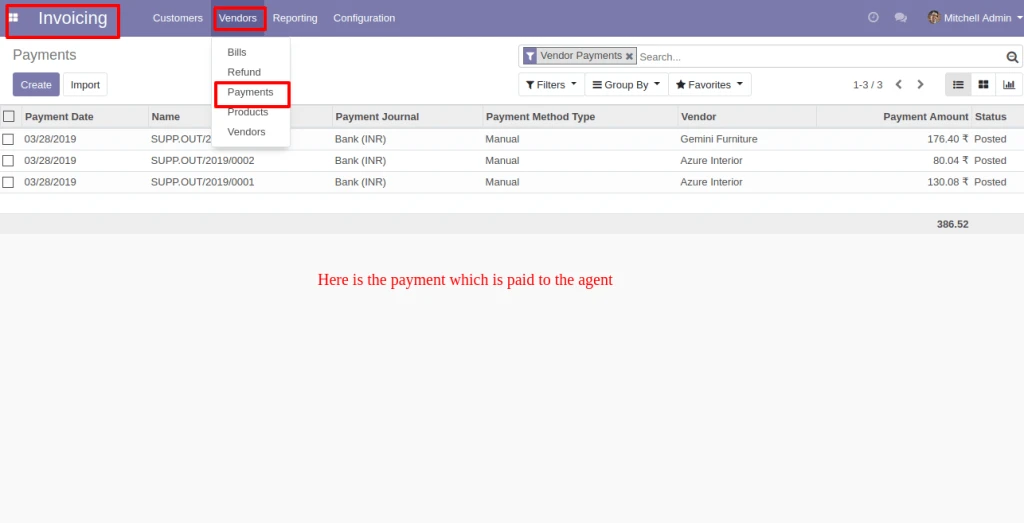
Here below is the Vendor bill which is generate from the Commission and related payment also be created.
Vendor BillPayment
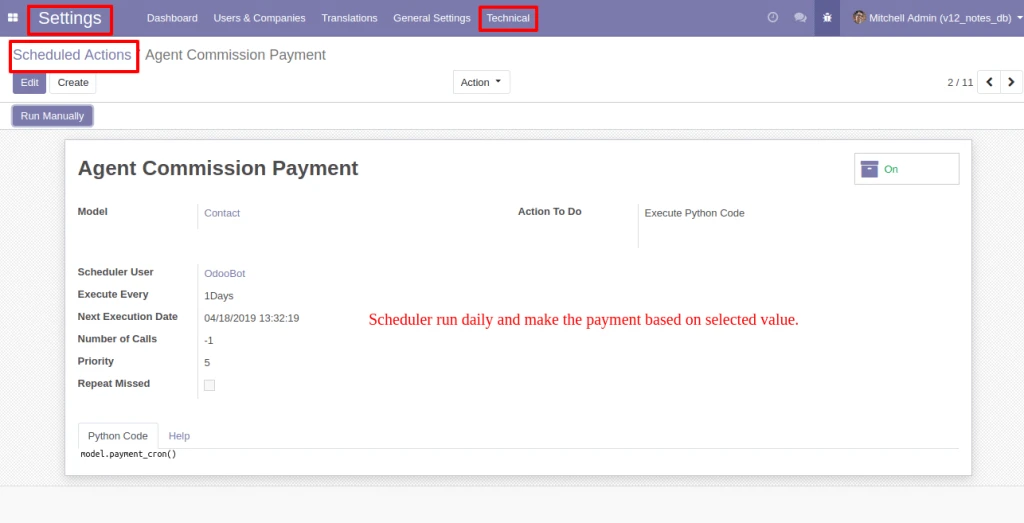
Schedular will run everyday and make the payment based on selected Payment Method(Monthly/Quarterly/Bi-Yearly/Yearly) in Agent form view.
Scheduler Run Daily
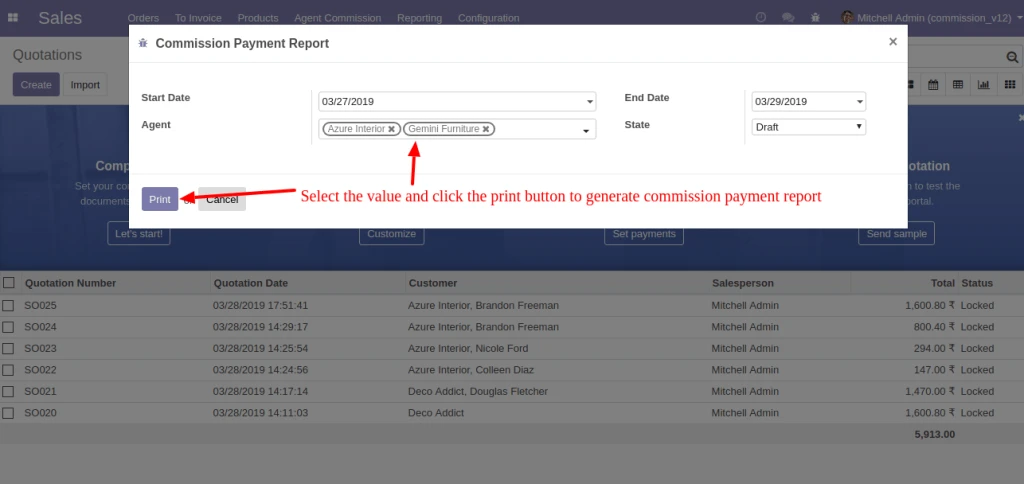
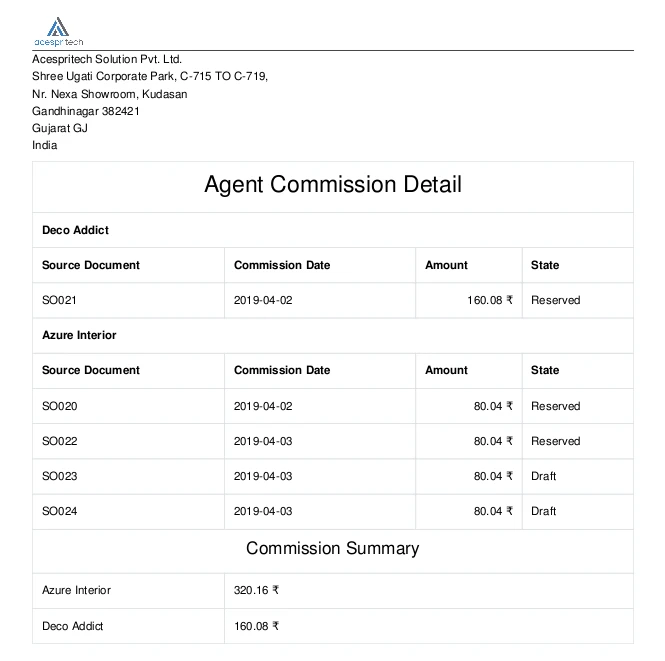
By clicking in Report menu, Commission Payment Report can be generated with having different filters as shown in image.
Commission Payment Report
Here below is the Commission Report for selected Agent(s).
Features
Easy To Manage Sales Commission.
Give commission to Sales Person.
Commission calculation based on Product, Product category, Sales team, Customer
Manage the commission calculate on Order confirmation, Invoice Validation, Invoice payment.
Manage the commission payment via Salary or Invoice.
How to use
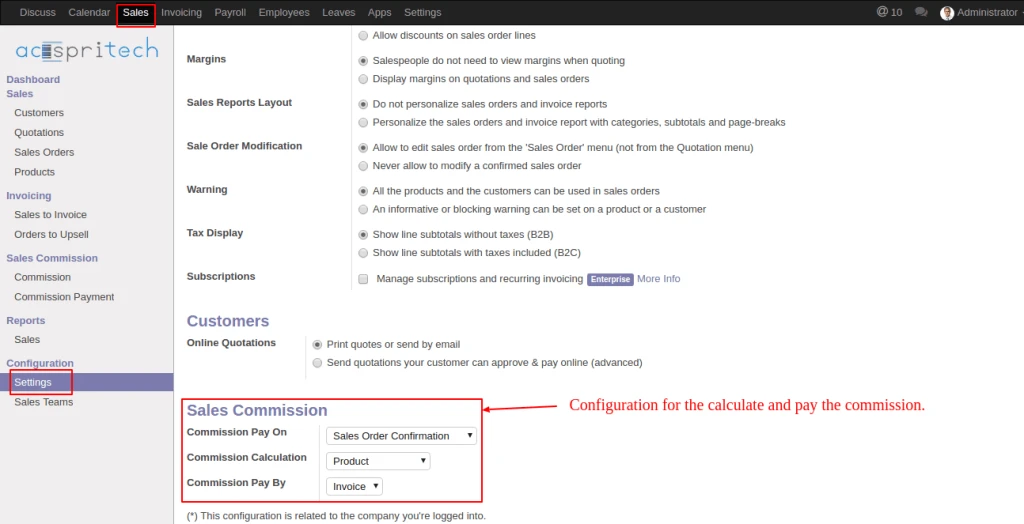
In Sales configuration, under the Sales commission, set the option for Commission Pay on, Commission Calculation, Commission Pay on. Based on this configuration the commission is calculate and paid.
Odoo Sale Configuration
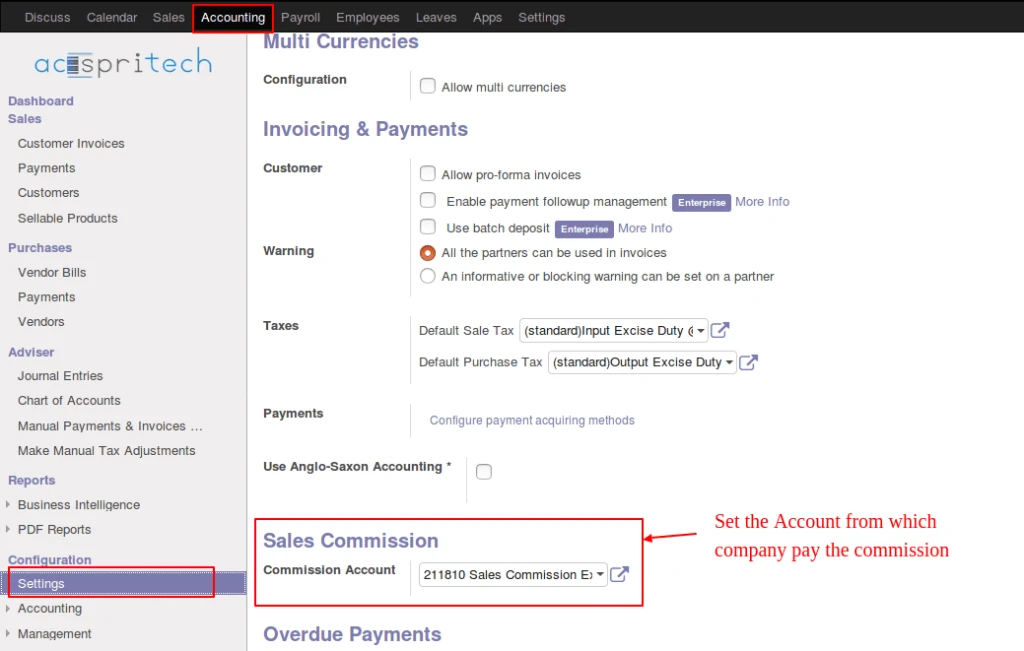
In Account configuration, under the Sales commission, set Account so when company pay the commission at that time commission pay from selected account.
Odoo Commission Account
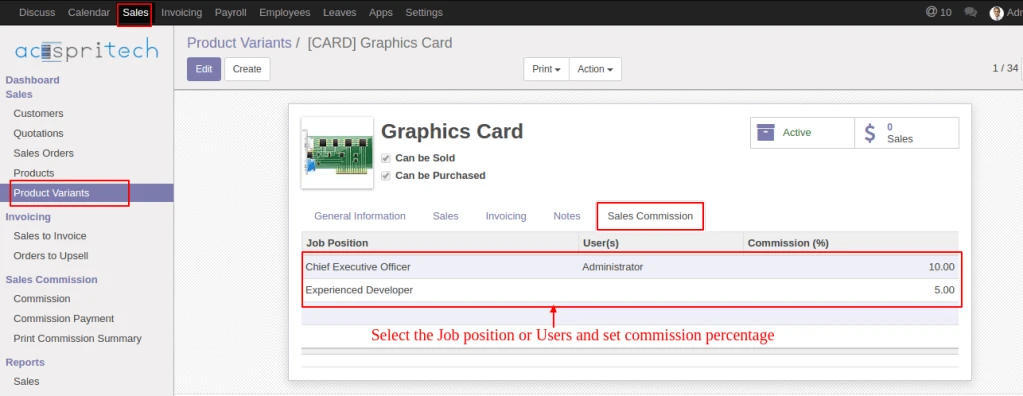
In Products, below the Sales commission tab, select the Job Position or Users and Commission percentage. This same configuration also available into the Customer, Product Category and Sales Team view.
Odoo Commission Configuration
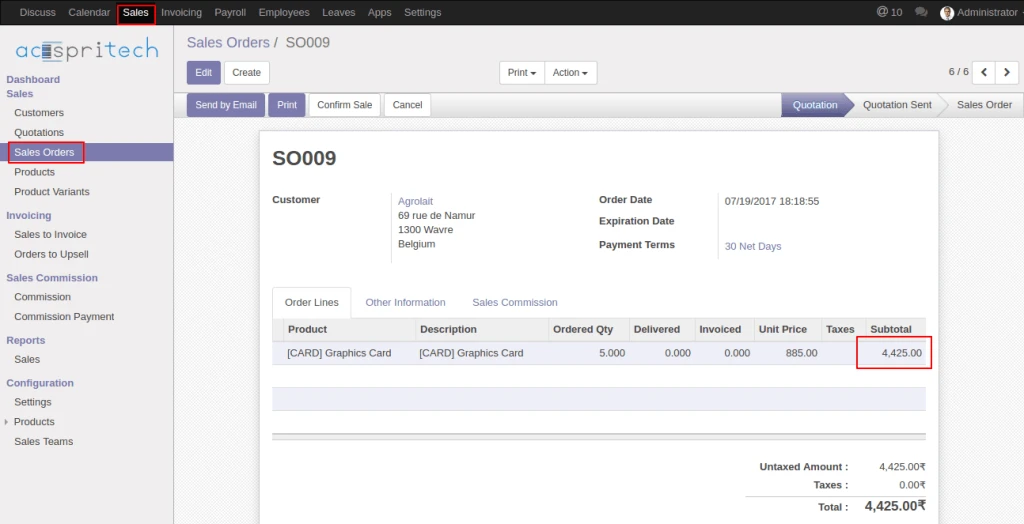
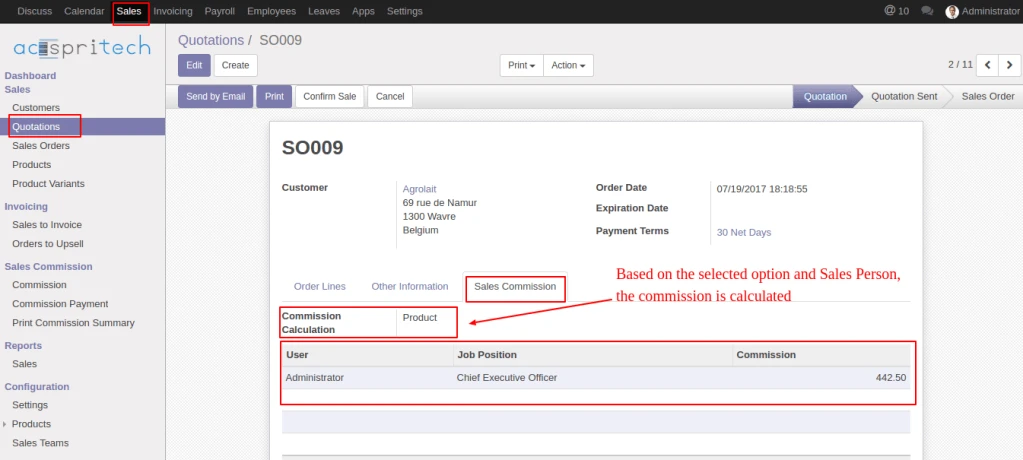
In Sale order, below the Sales commission tab, based on the Sales person and commission calculation option, commission data is calculated.
Odoo Sales OrderOdoo Commission Calculator
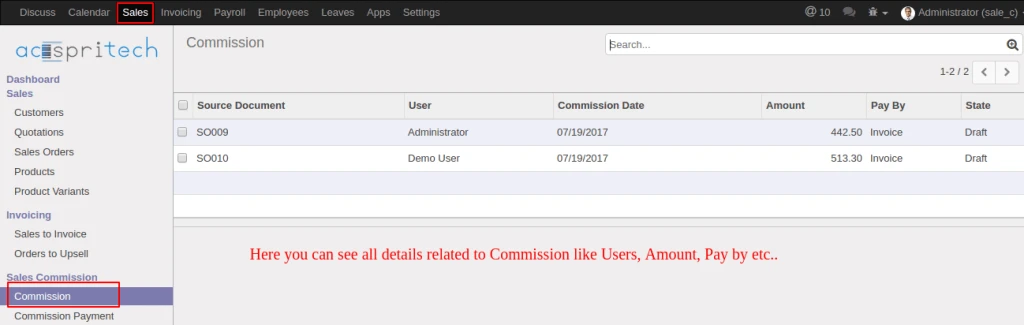
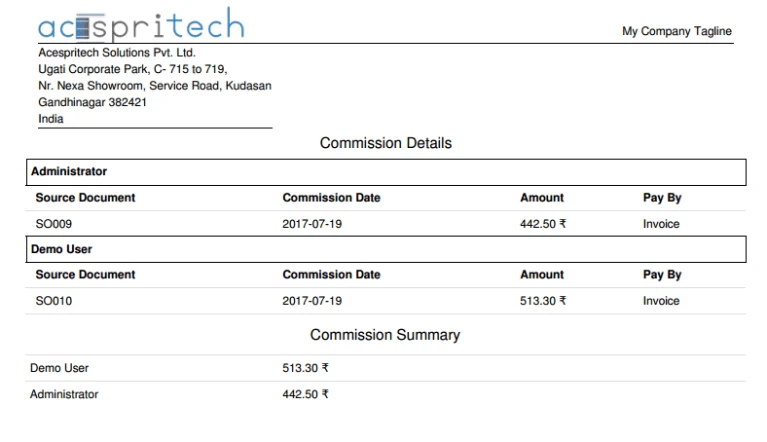
Into Commission menu, you can see the commission’s detail like user, amount, pay by etc…
Odoo Commission Data
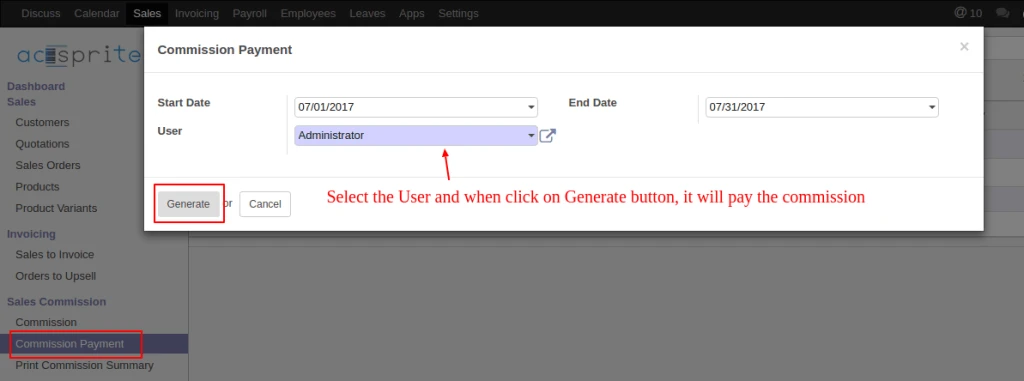
Click on the commission payment, into opened pop-up, select the user, when click the generate button it will paid the commission which is pay by ‘Invoice’ and make the account Journal entries.
Odoo Wizard Pay Commission
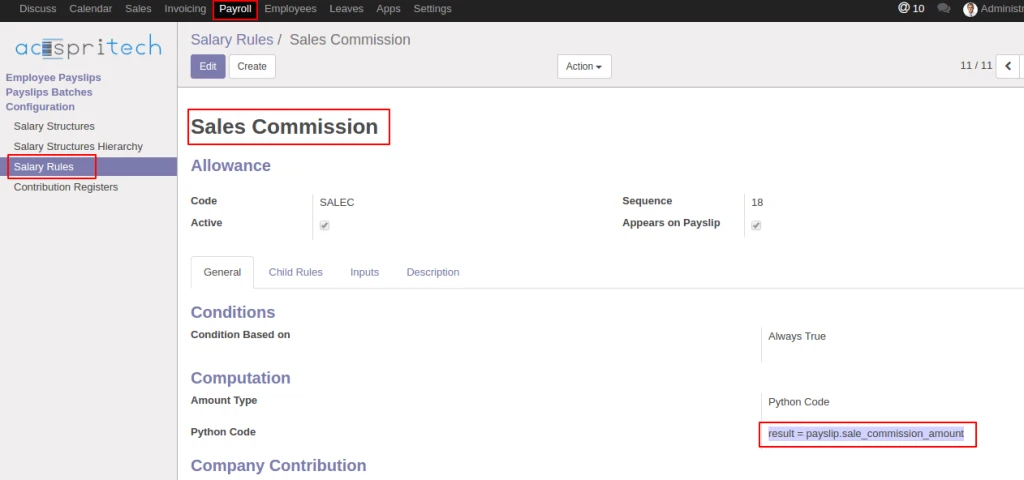
When module is install, into salary rule, you get new salary rule for pay the commission by Salary.
Odoo Commission Salary Rule
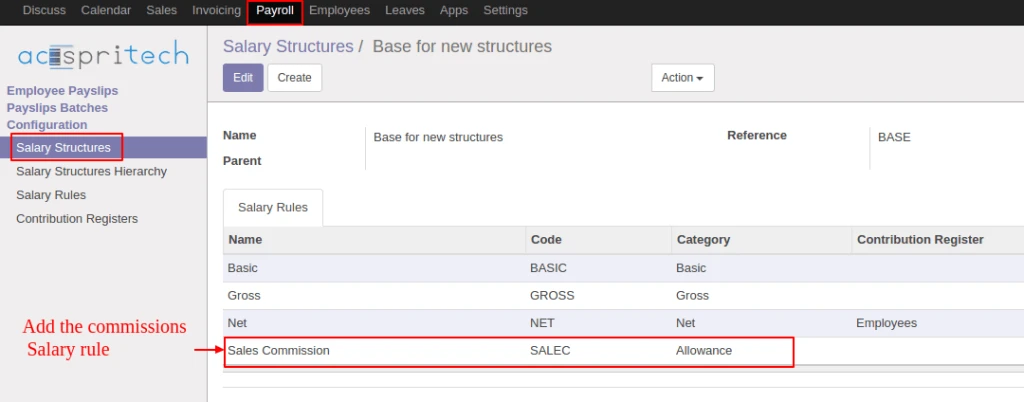
Add this new salary rule to Salary structure, so when employee payslip is create at that time employee related user’s commission amount is added into employee’s salary amount.
Odoo Salary Structure
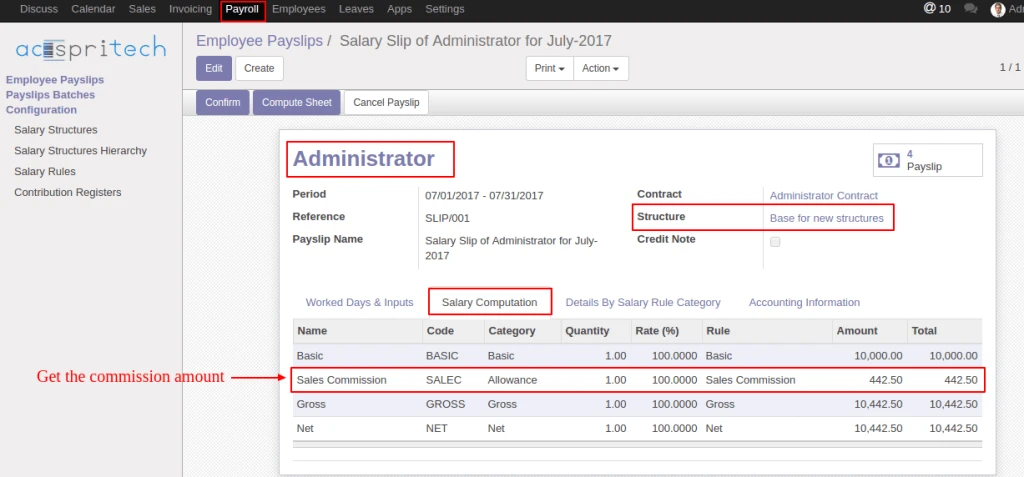
When the employee salary slip is generate, it will automatically added the commission amount and when confirm payslip, employee related user’s commission set to ‘Paid’.
Odoo Commission Payslip
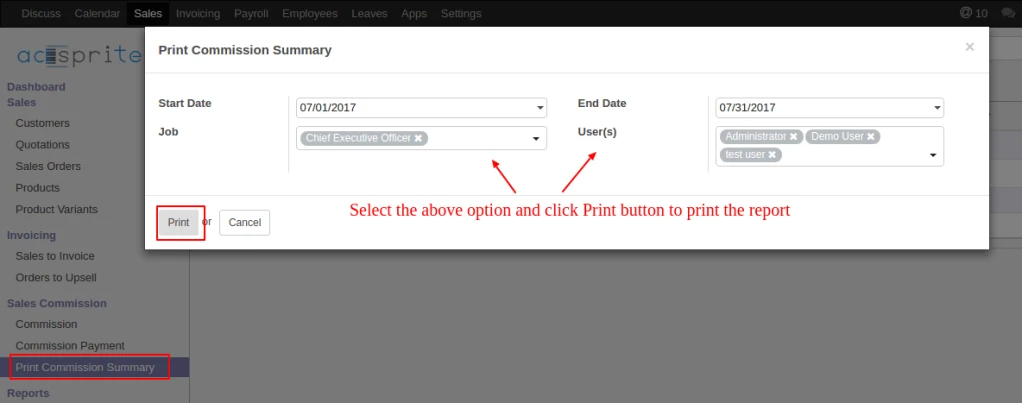
Click Print Commission summary menu, into opened pop-up, select the available options and click print button for printing the commission report.
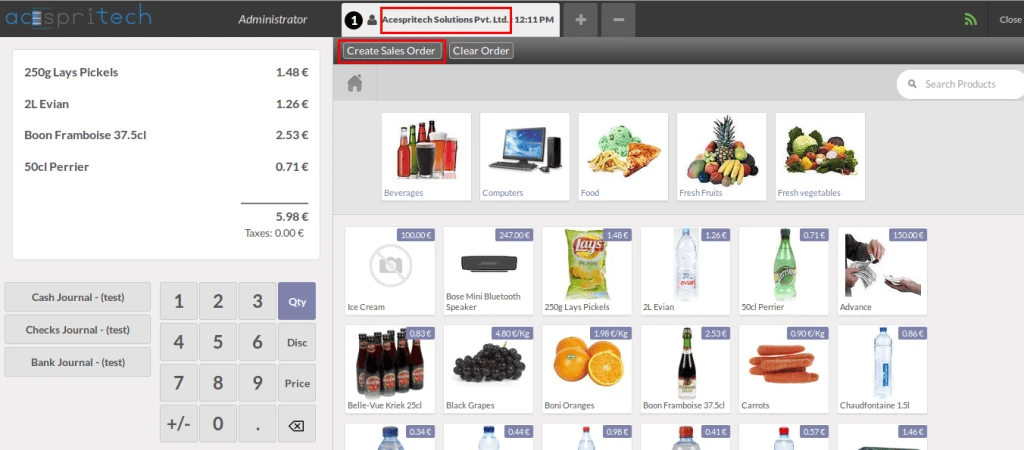
We have already created this feature before to create sales order from point of sale, but in this module we have done enhancement. Lets have look. Here is default Odoo point of sale screen.
Odoo Point of Sale Screen
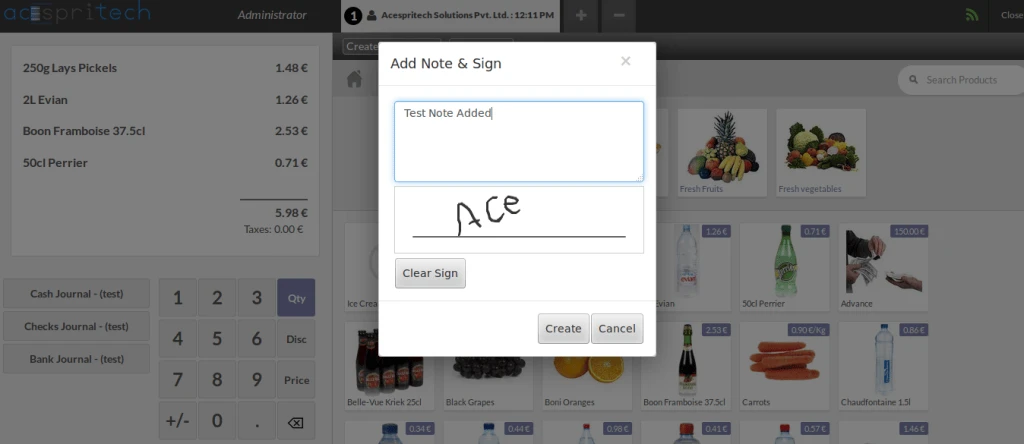
After assigning customer and product selection, when we click on “Create Sales Order” button, then following screen will open to add any note and sing box for customer.
Sign from Odoo POS
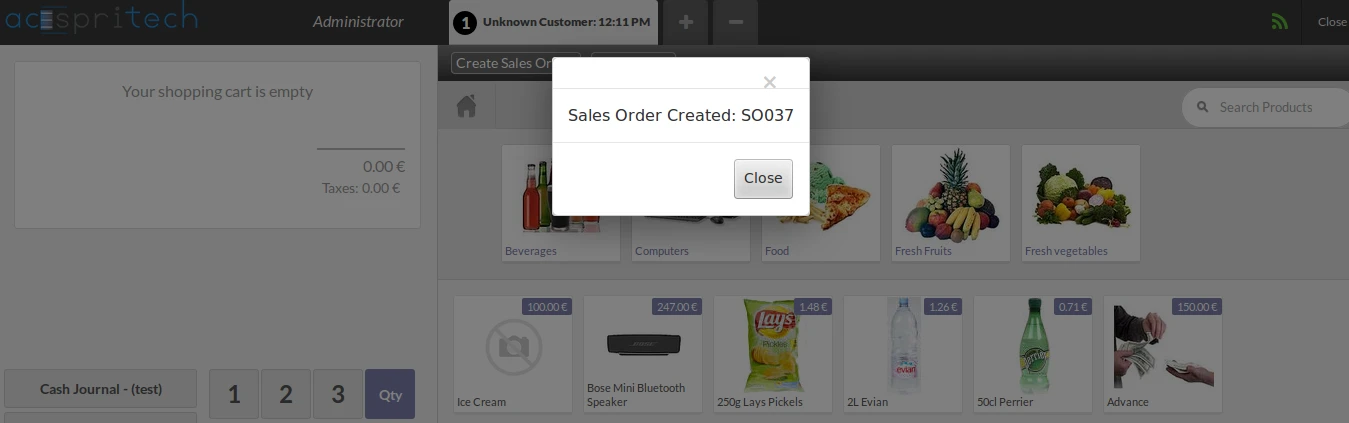
After note and signed by customer, when we click on Create, then Sales Order will be created like below screen with popup.
Create SO from POS with Signature
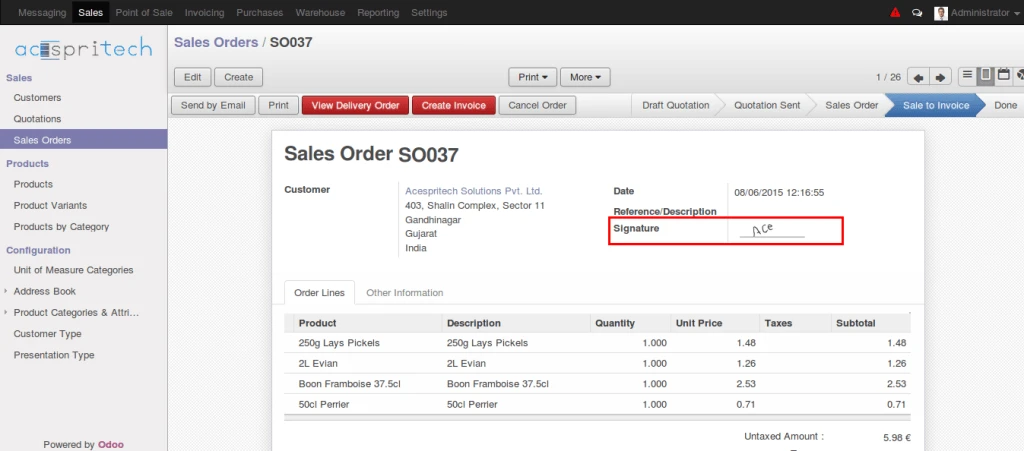
Here is the SO created from POS with signature visible.
SO Created from Odoo POS
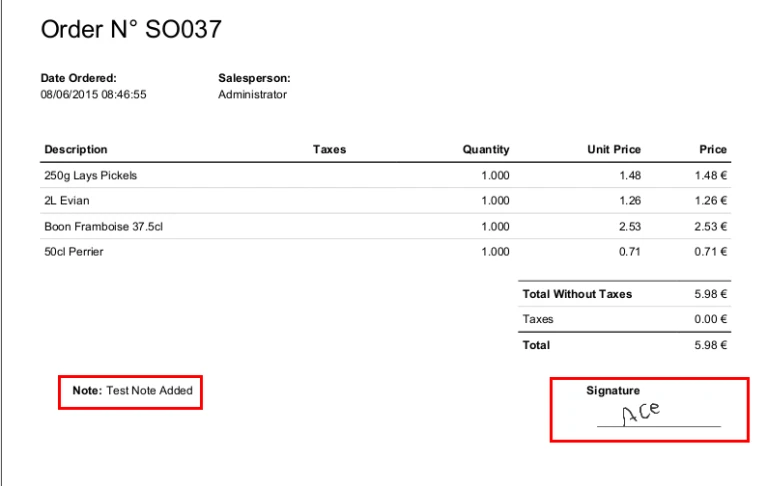
And the same signature is available in Sales Order report also.
Currently odoo has inbuilt option for providing discount on sales order and invoices. But this feature is flawed as it only lets you give discount on each specific order line. In many cases of retail business, the company needs to give discount on final amount of sale order or invoice. So for this scenario we developed a feature called “Global Discount”
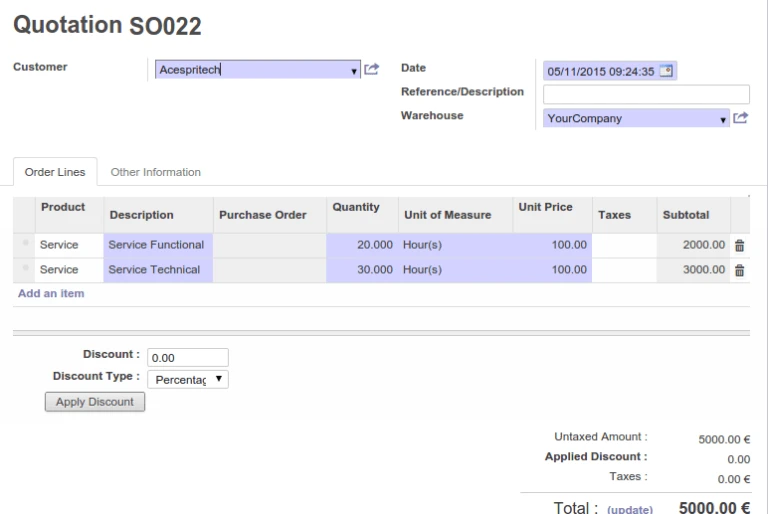
Odoo Sale Order
Above is a simple sale quotation with global discount feature. We can see on the bottom left part, there is option to apply discount on the whole sale order amount. There are two ways to apply discount as mentioned below: Percentage – This will discount the sale order untaxed total by the percentage amount entered in “Discount” field. Fixed – This will deduct the value entered in “Discount” field directly from the Sale Order untaxed total.
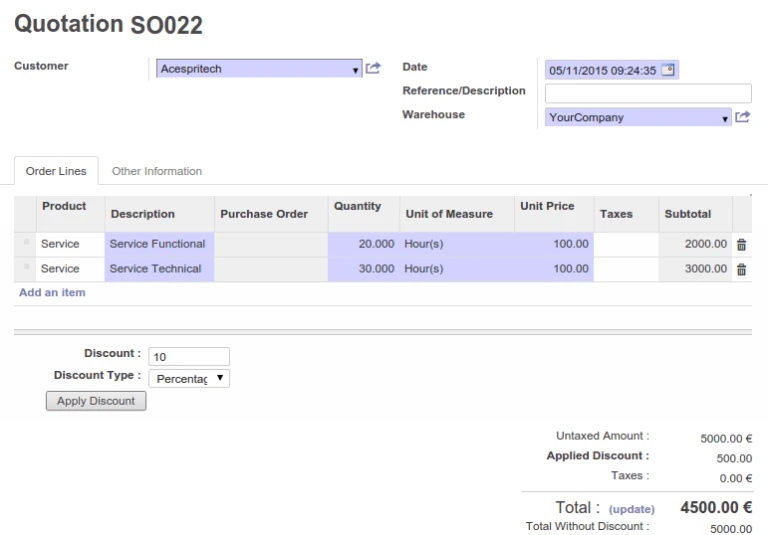
Odoo Sale Order with discount applied
In above shot, we can see a global discount of 10 percent applied to the order, similarly we can also apply a fixed type discount. The flow will also continue when we create an invoice from sale order.
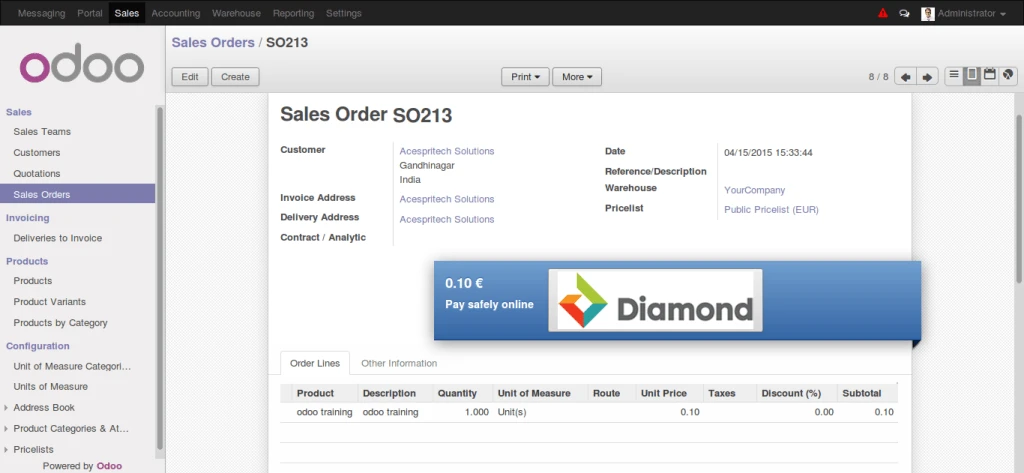
Confirming Sale Order
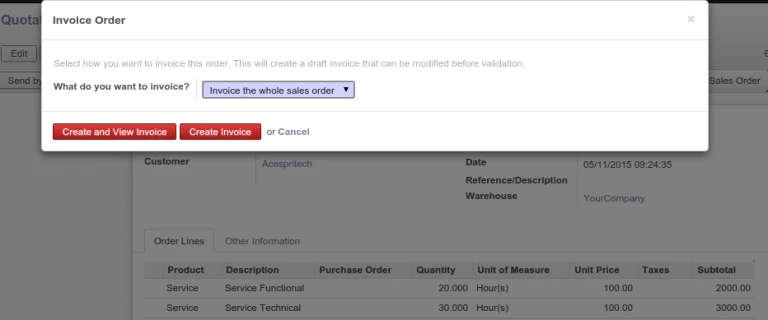
Now lets confirm and create invoice from sale order.
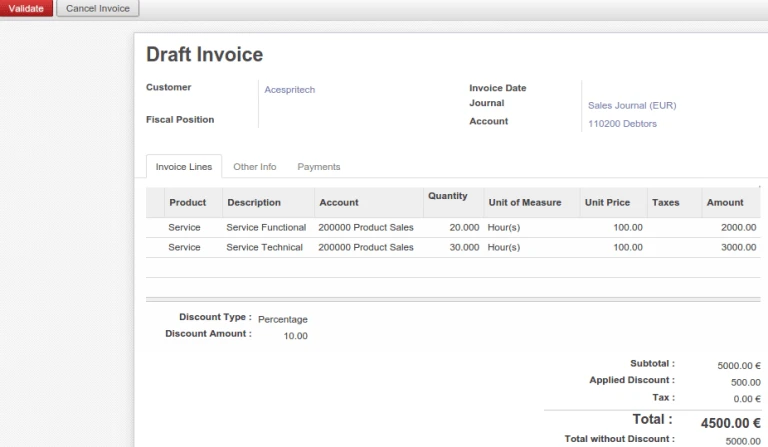
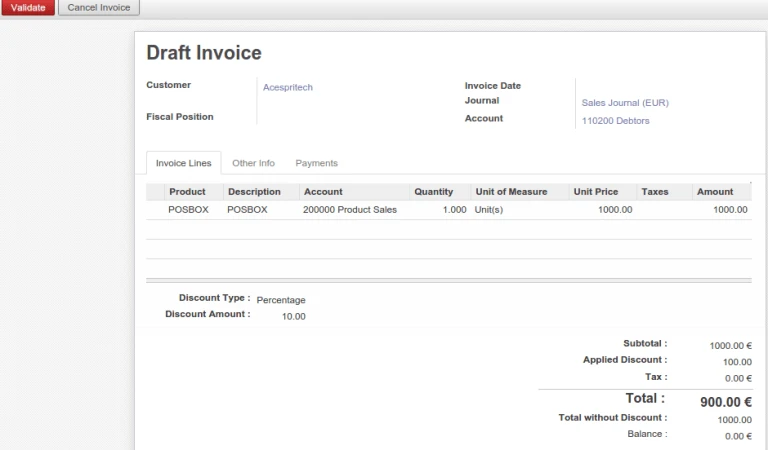
Draft Invoice from Sale Order
We can see that all the details of discount is carried forward to invoice also, so that we can also change them if we like from the invoice also.
Sometimes a business requires that invoice is created after delivery order, in that case also global discount will work when Invoice Mode is “On Delivery Order”.
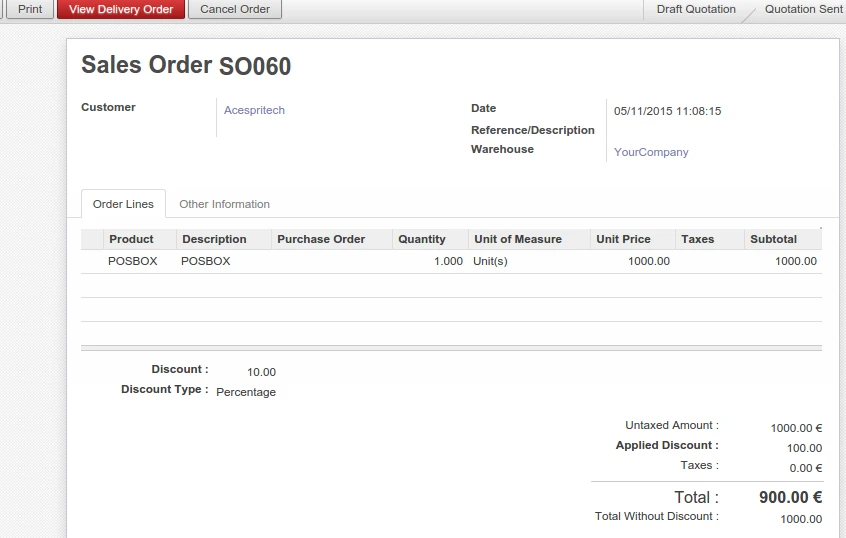
Sale Order with Invoice after Delivery Order
In above sale order the Invoice mode is “On Delivery Order”, so first we need to finish delivery.
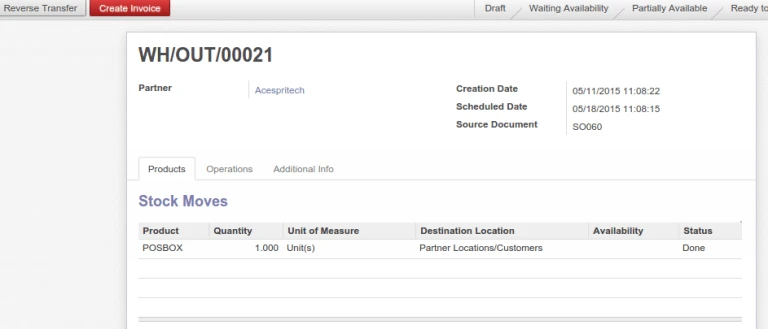
Odoo Delivery Order
Now we confirm Delivery Order and then create Invoice.
Invoice created from Delivery Order
The invoice created from delivery order will also hold the values for discount that was applied on sale time. So that we can adjust it from invoice also.
Once we validate the Invoice, we would also want to manage the accounting entries related to discount in a proper way. For this we have added an option in the company form as below.
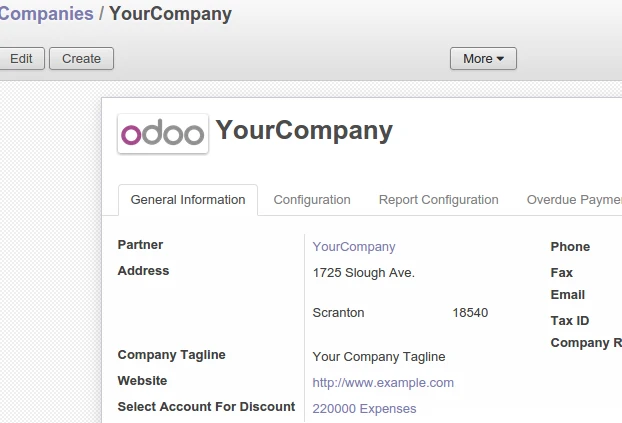
Discount Account defined in company form
User just need to define which account he wants to use for managing accounting entries for the discounts provided in the field “Select Account for Discount”.
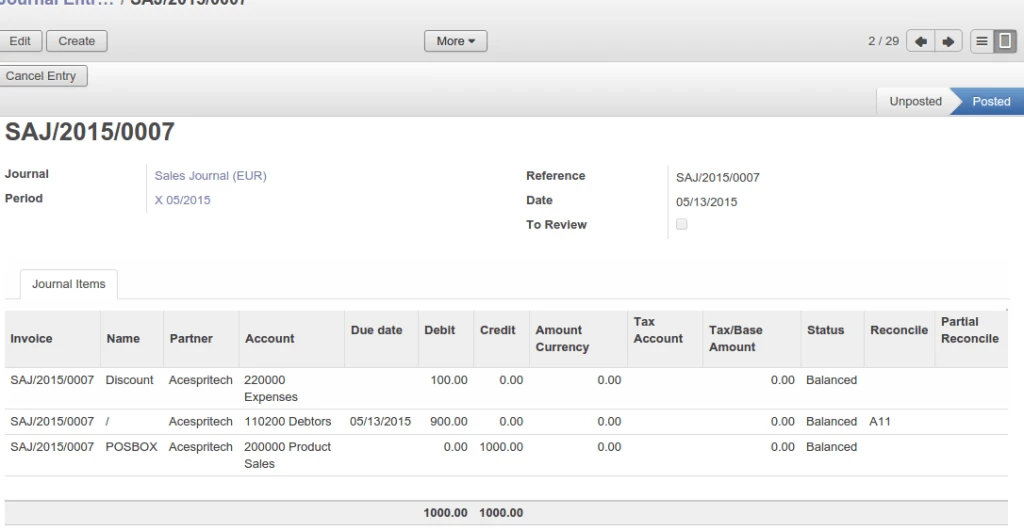
Journal Entry of Invoice Payment with Discount
So when we validate the invoice and register payment, it will use the account defined in Company to create related journal items. So we can keep track of discounts provided to our customers.
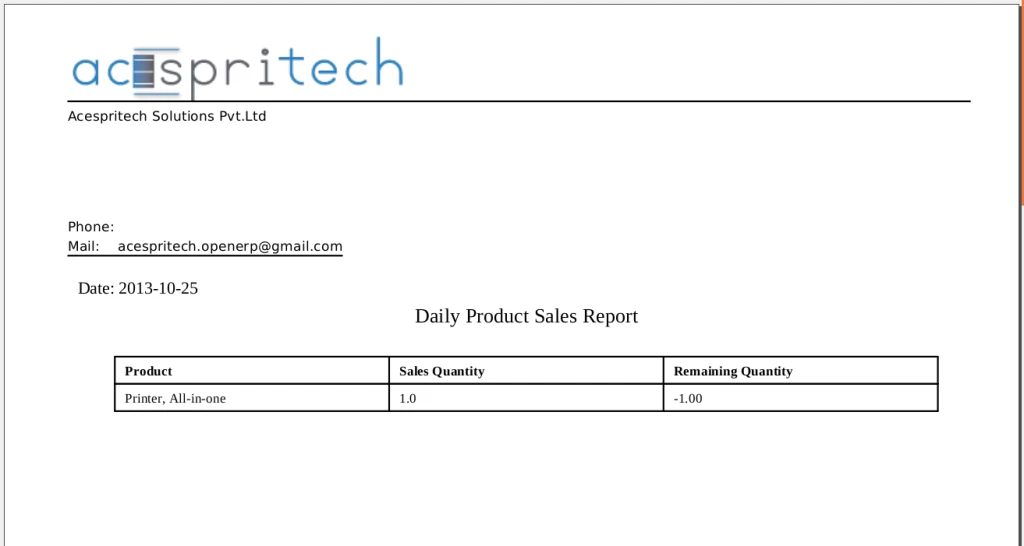
We are discussing about business where company is getting products from suppliers, stores it in warehouse or any other locations, and selling of it. Sometimes it requires to inform supplier that how many daily sales occur for products and how much remain at the end of the day.
Some companies are not buying products from suppliers but keep it in their warehouses and selling on behalf of suppliers.
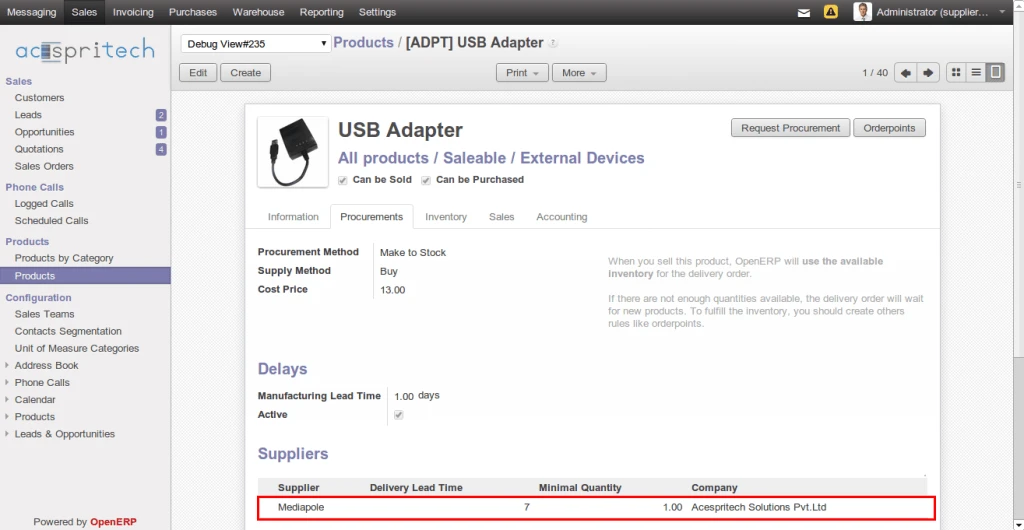
In intial state, we have define and assume that one product is supplied by one supplier only.
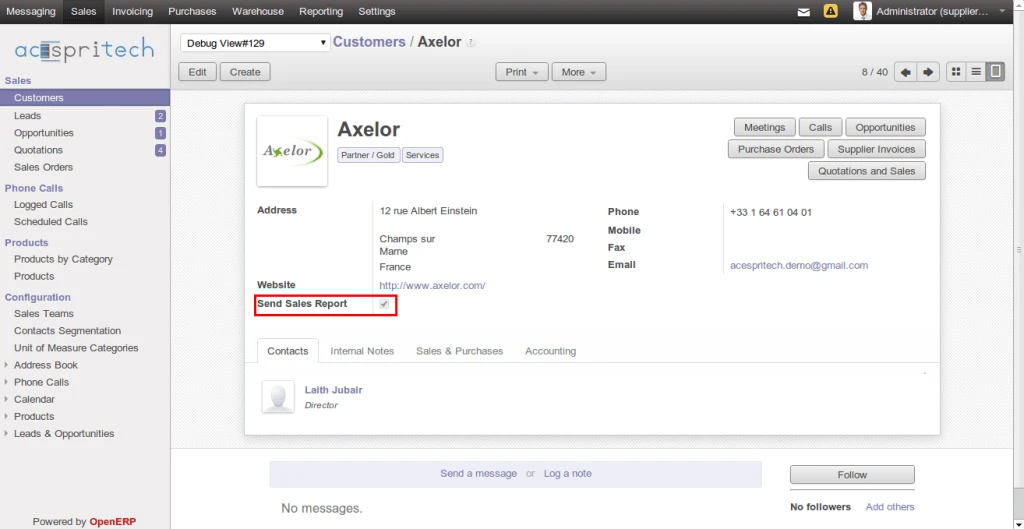
OpenERP Product Supplier
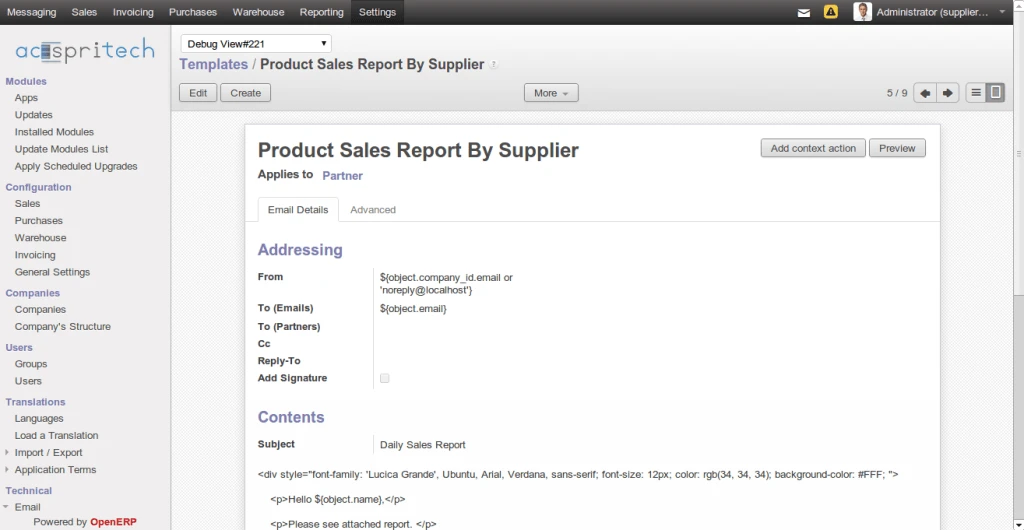
For sending email we have created email template which make it more generic.
OpenERP Email Template
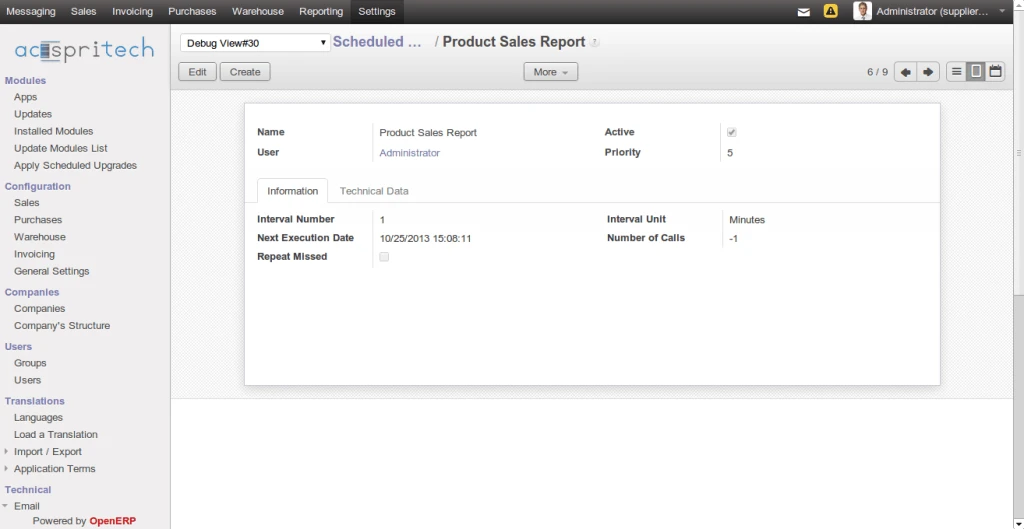
And for automatic sending emails, we used cron jobs which makes work very easy.
OpenERP Schedular
It is possible that all supplier don’t require notification about products those sold today. We make it optional also.
OpenERP Supplier
Now going to make sales order where one product has supplier defined and require to get notification about sales.
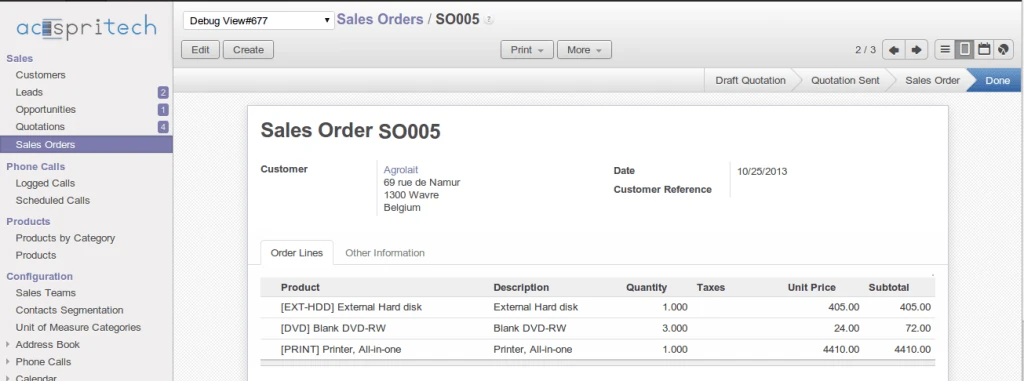
OpenERP Sales Order
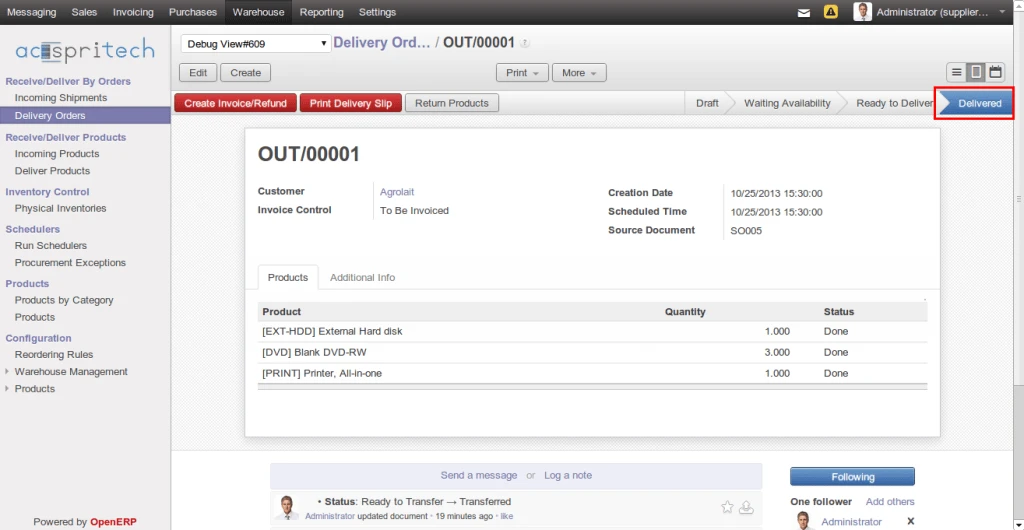
And we have completed all process of delivery order also.
OpenERP Delivery Order
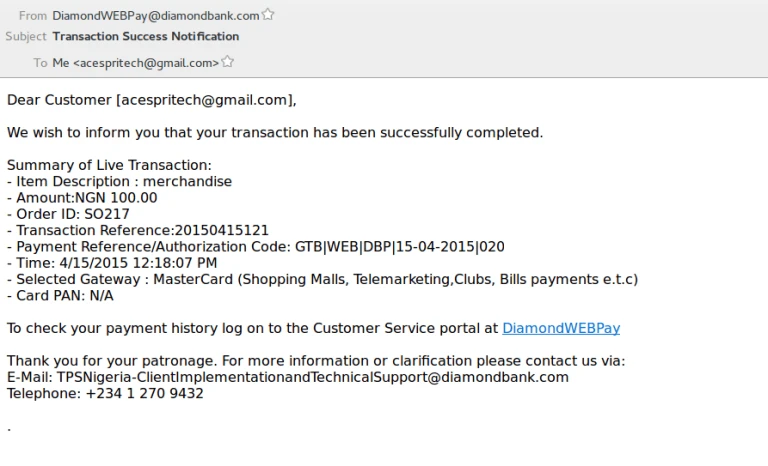
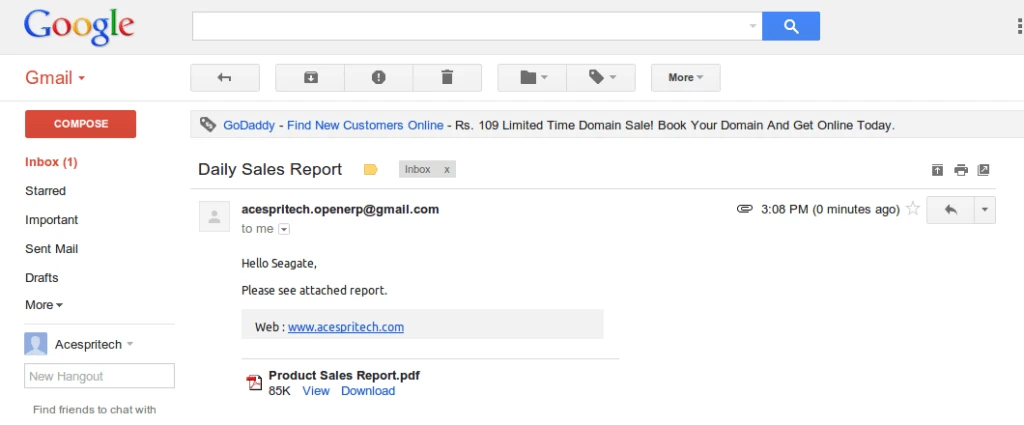
When cron job is going to execute, it is sending email like below:
A small but important feature in OpenERP Point of Sale.
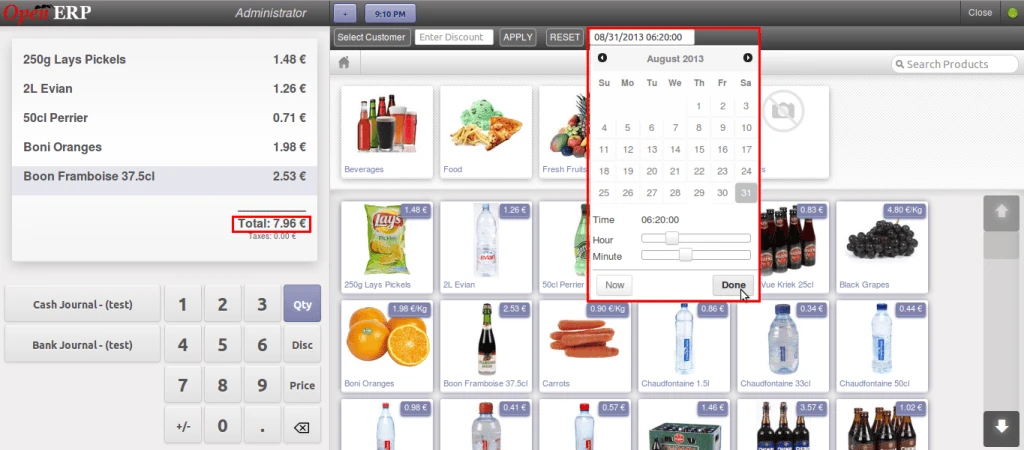
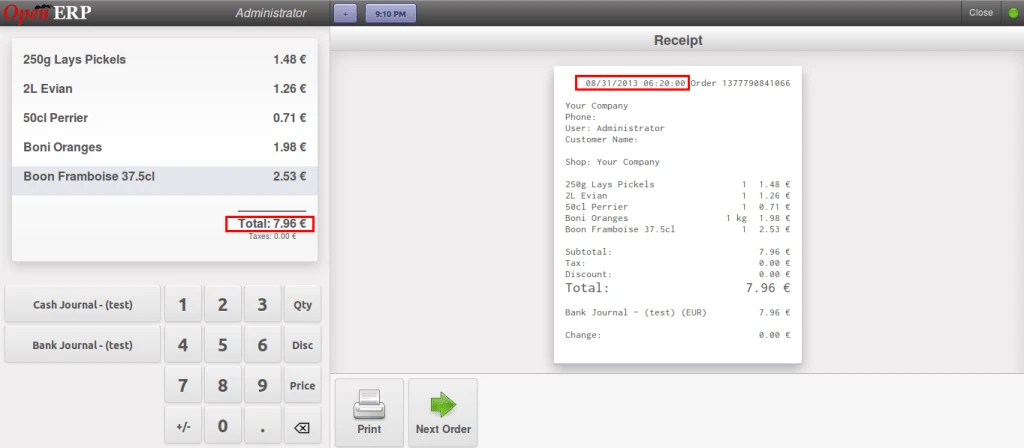
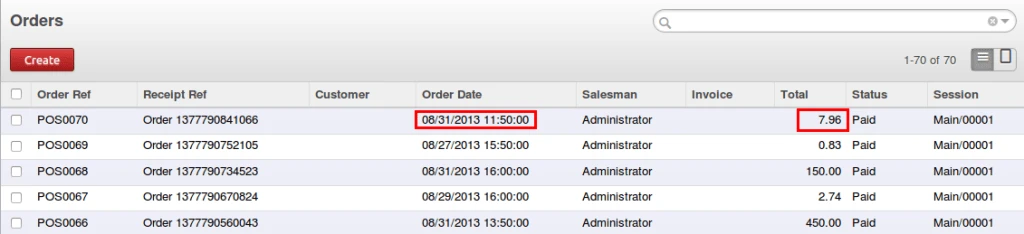
If we look at the screens that are displaying below, gives complete detail of what we have implemented.
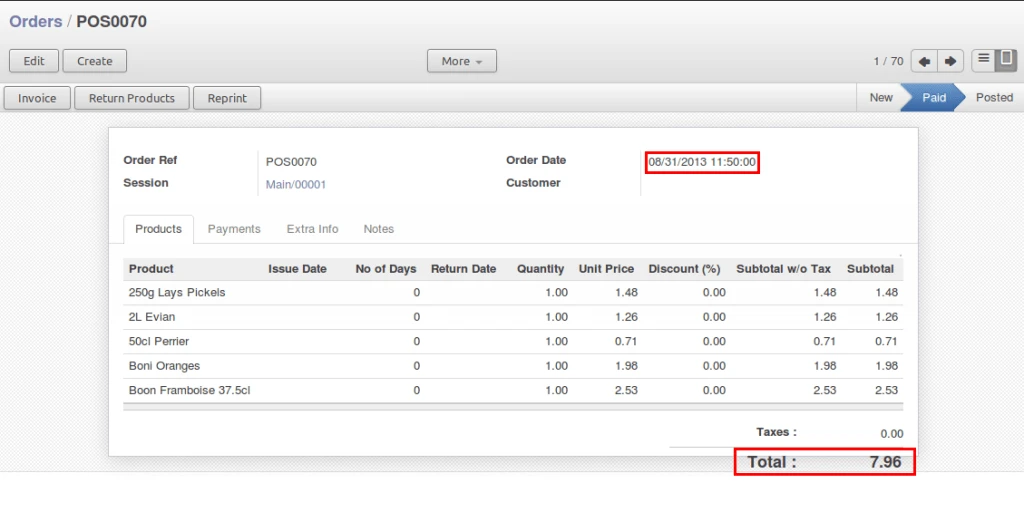
User can select Order Date from POS Interface and it will be displayed on POS Receipt as well as backend order also.
Its upto us that how we use but normally we use POS for current date sales only.
OpenERP POS Date Selection
We can see that selected date in first image is displayed on the receipt here.
OpenERP POS Order Receipt
The same date is also displayed in the POS Order table in the backend. Because of time difference calculation in the OpenERP, we can see time different on the order but that can be resolved.