Category Archives: OpenERP
OpenERP is an enterprise resource planning softwaree and an incredible platfom for business applications development.
OpenERP Point of Sale: Create invoice for multiple orders together
Though its not so complex module but still would like to share with you what we have developed.
As we know that from POS Back Order, we can create invoice one by one. So here we made solution where we can select more than one POS Orders and create invoice at once.
In below screen, we can see that there is no invoice created for these POS Orders.
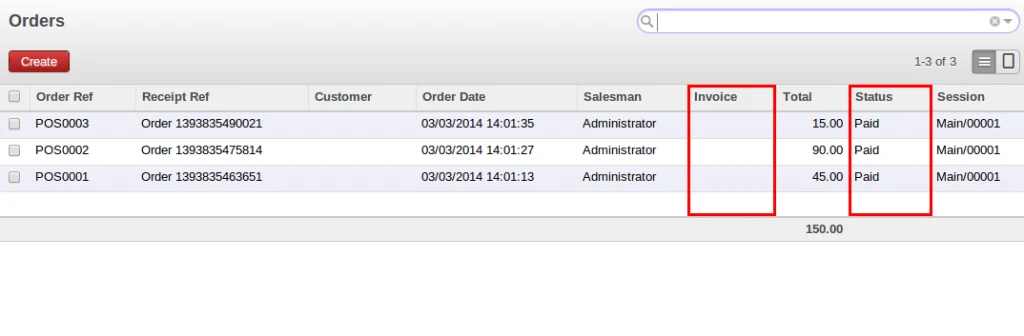
OpenERP POS Orders
We can easily filter POS Order by dates and it will display order which are not relate with any invoices.
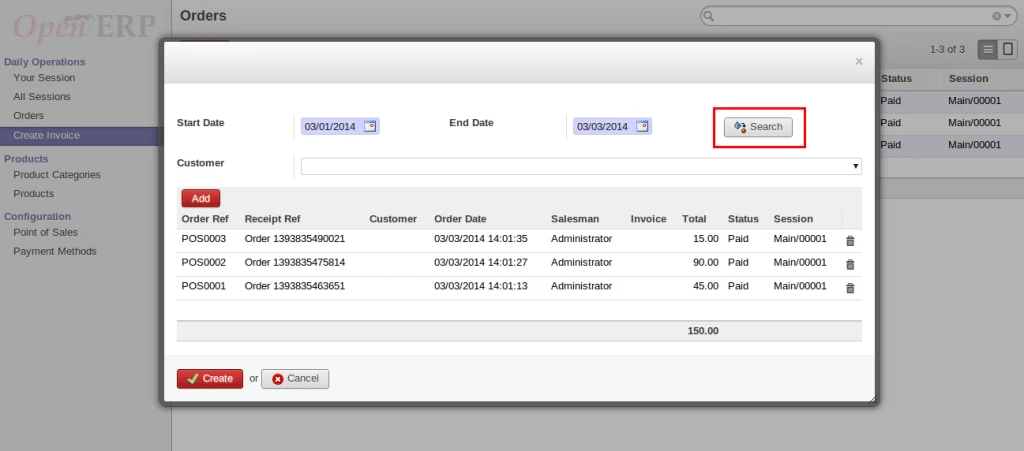
Search POS Orders
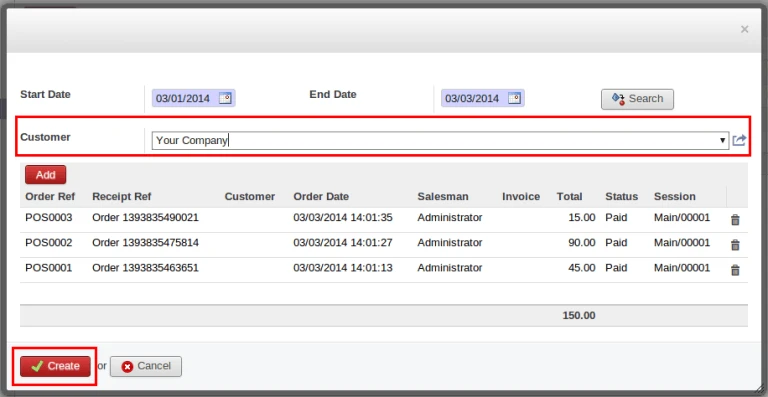
For creating invoice for POS Orders, it requires to select customer.
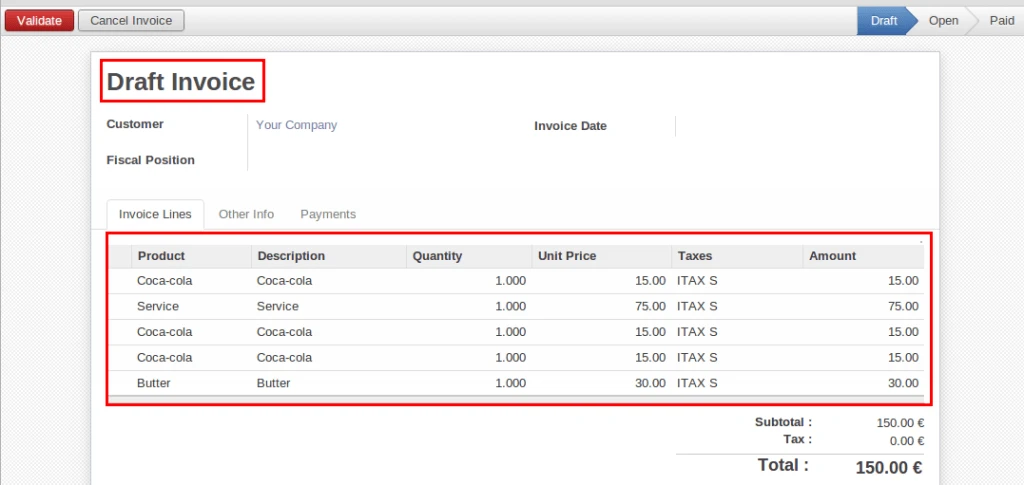
Create Invoice
It will take order lines of all selected POS Order and create one customer invoice in DRAFT state.
Selection of Customer
After creating invoice, all selected POS Orders “Status” and “Invoice” fields value will be change.
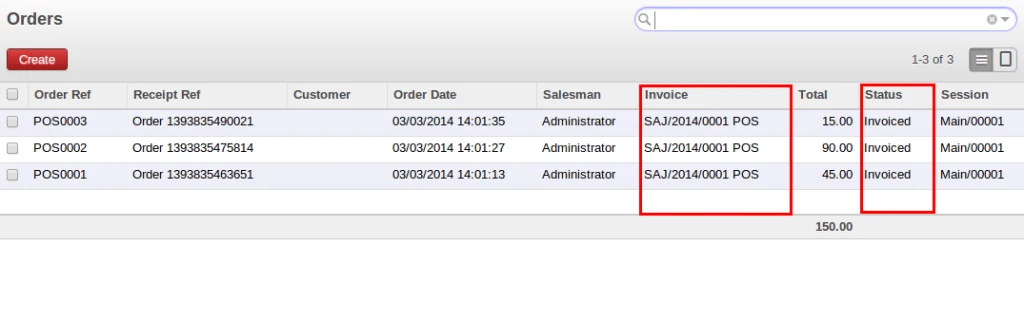
POS Order after invoice validation
In case of “Cancel” invoice, it will update both fields into POS Orders.
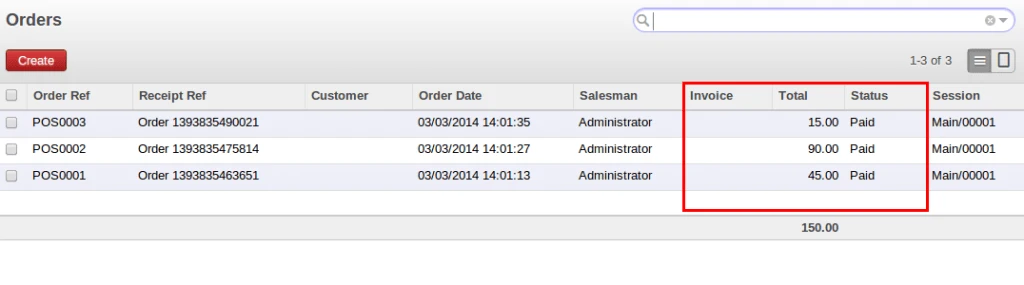
POS Order after cancel invoice
OpenERP SagePay with Token
SagePay is providing very good feature to process with Credit Card. It is not necessary to store credit card details into database.
SagePay server will provide you TOKEN like below {5C0DC8AD-DE7A-F65C-C53D-CC6C23BF3BEF}.
This TOKEN can be used for further transactions and make your work very easy. User can also remove current token and generate new one.
We have implemented functionality in such a way that we can store more than one TOKEN for customer. First we have to make configuration for SagePay server authentication.
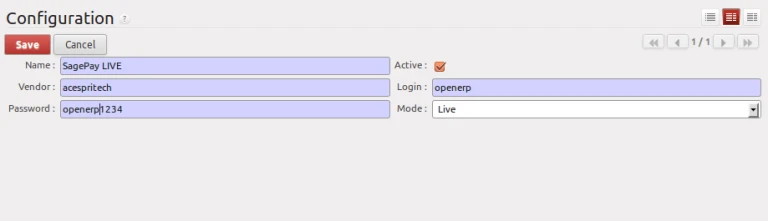
SagePAy Configuration
It requires to generate token from SagePay server. It will not store credit card number into database.
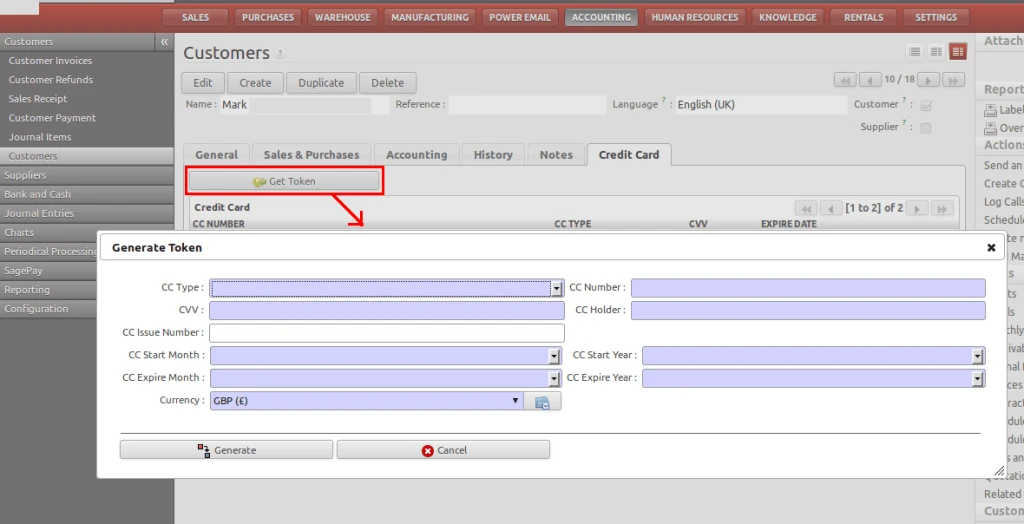
Generate SagePay Tocken
Once we will click on Generate button, it will store some required information into openerp database with TOKEN for further operations.
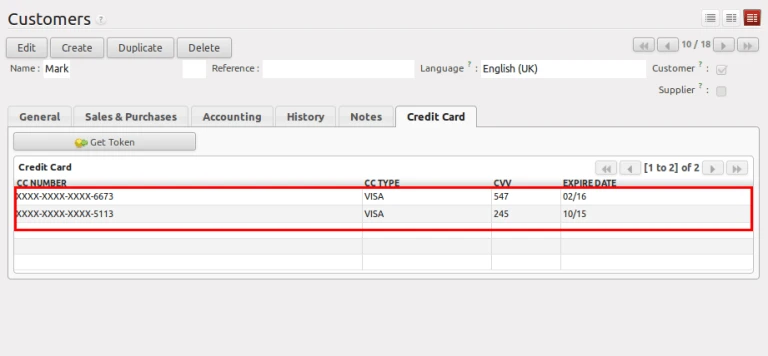
Credit Card details
In Customer Payment, we will find new button “Pay by SagePay” which will open popup window like below screen. User can select one credit card to process with SagePay. It will display only valid credit card number which has TOKEN generated from server.
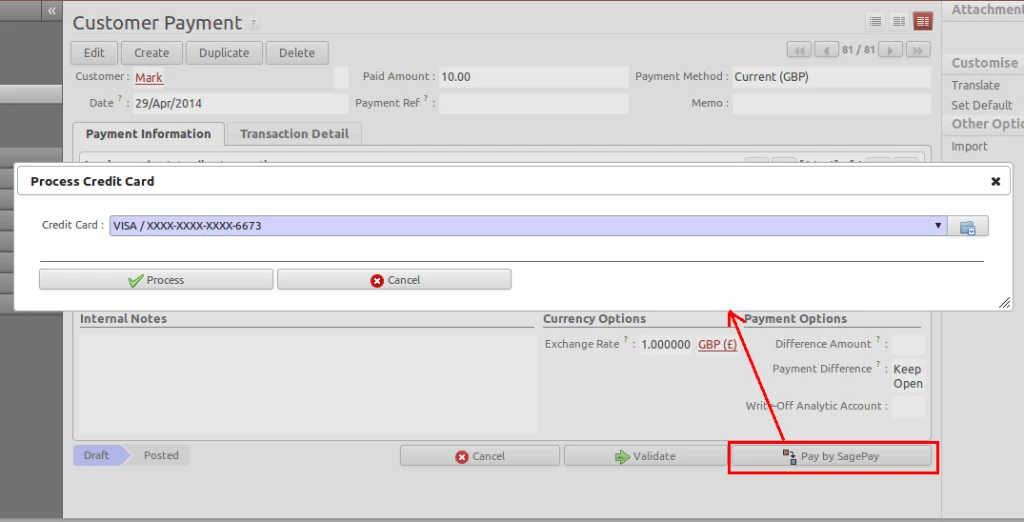
Credit Card Selection
After successful transaction, sagepay server will return transaction ID and messages which are stored into Customer Payment for future reference.
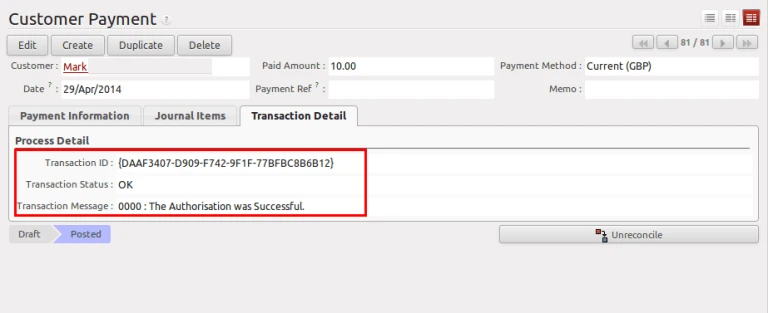
SagePay Transaction Success
We are also keeping history of all successful transactions into OpenERP.
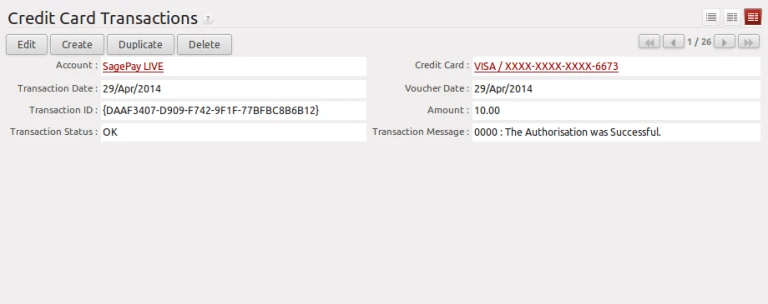
SagePay Transaction History
OpenERP integration with CraftyClicks
We have integrated “CraftyClicks” services with OpenERP. It provides services to find address based on postcode. https://www.craftyclicks.co.uk/
CraftyClicks provides free as well as paid service. By Free service, user can only access few postcode. For accessing all available postcode of website, it require to take paid services and we will get Token (or Key).
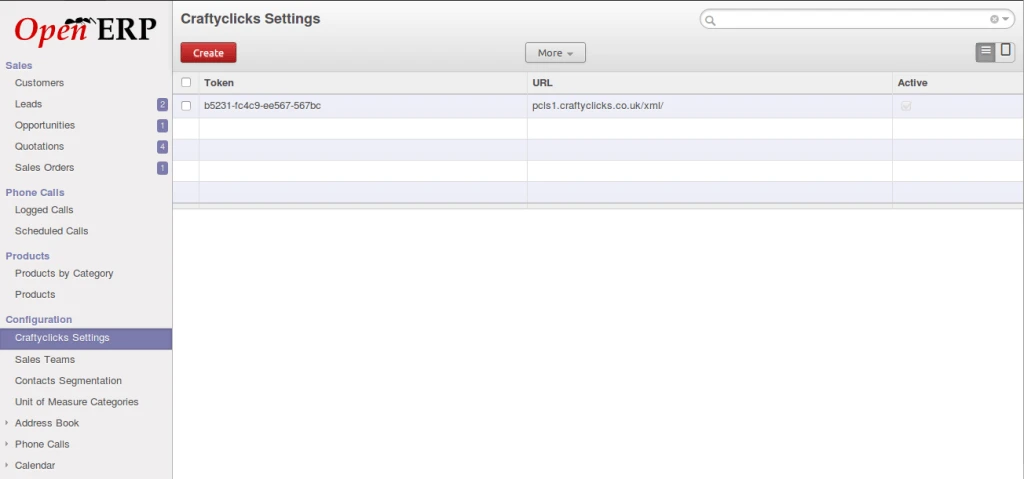
CraftyClicks Configuration
We have added postcode lookup feature in Customer and Lead form. User has to enter postcode and click on “Find” button.
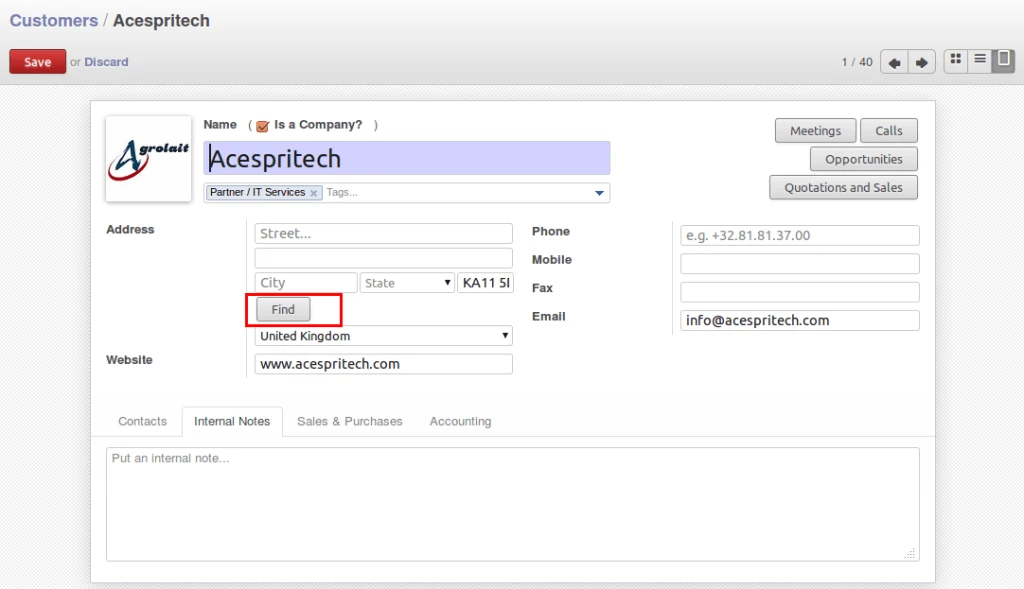
OpenERP Partner Form
It will popup small window like below and user can select only one address and click on “Save” button.
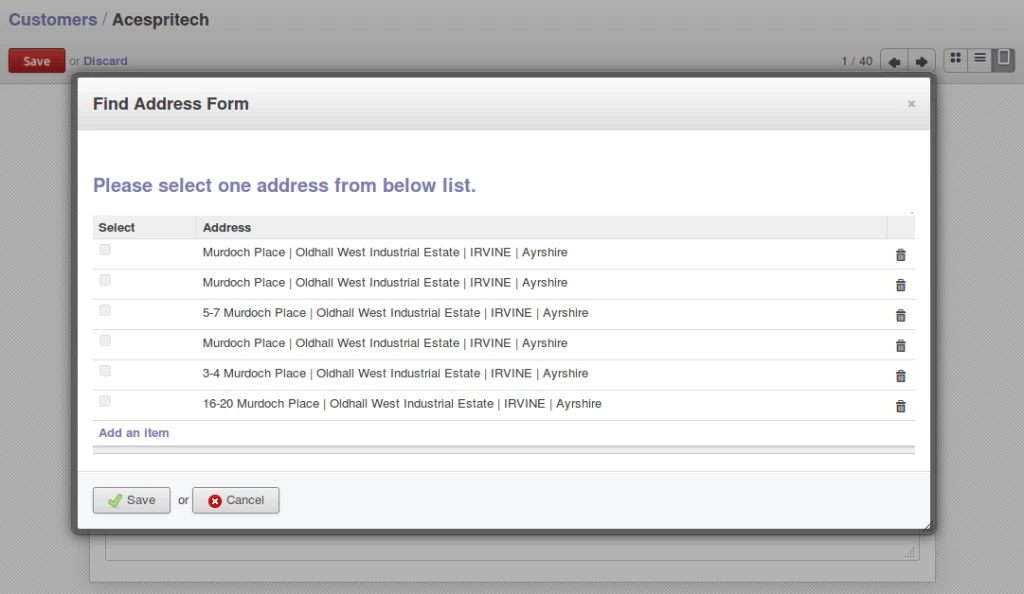
CraftyClicks Address List
It will store address information into Customer form.
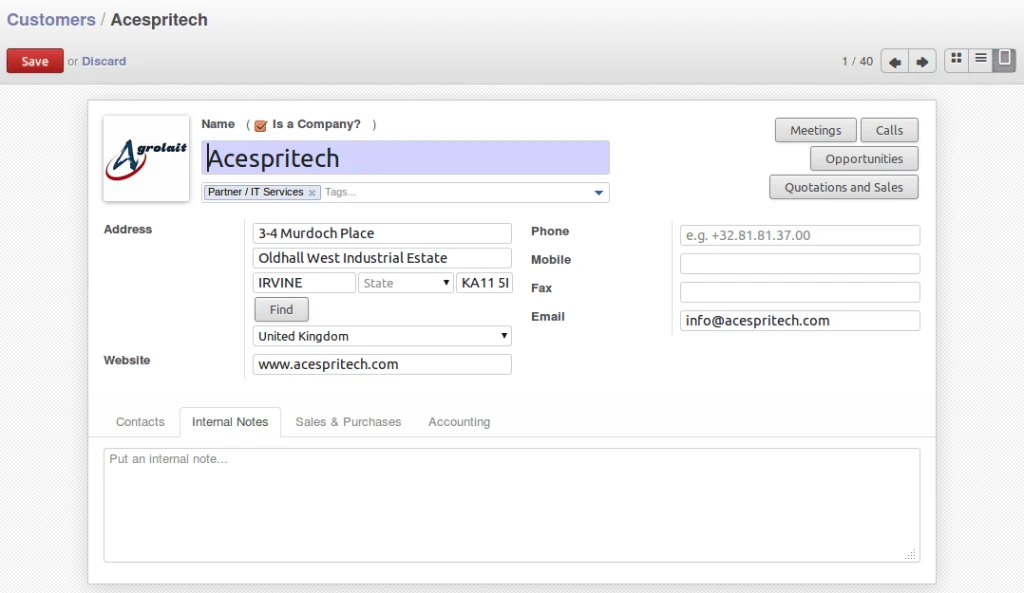
Customer form after address
User will find same “Find” button into Lead form also.
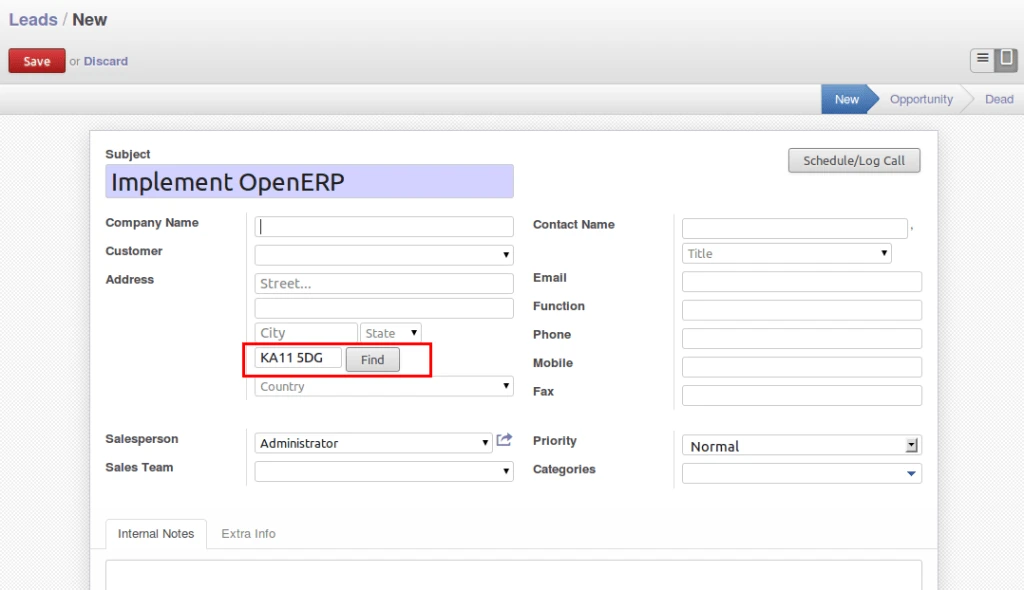
OpenERP Lead Form
It will open same popup window for selecting address.
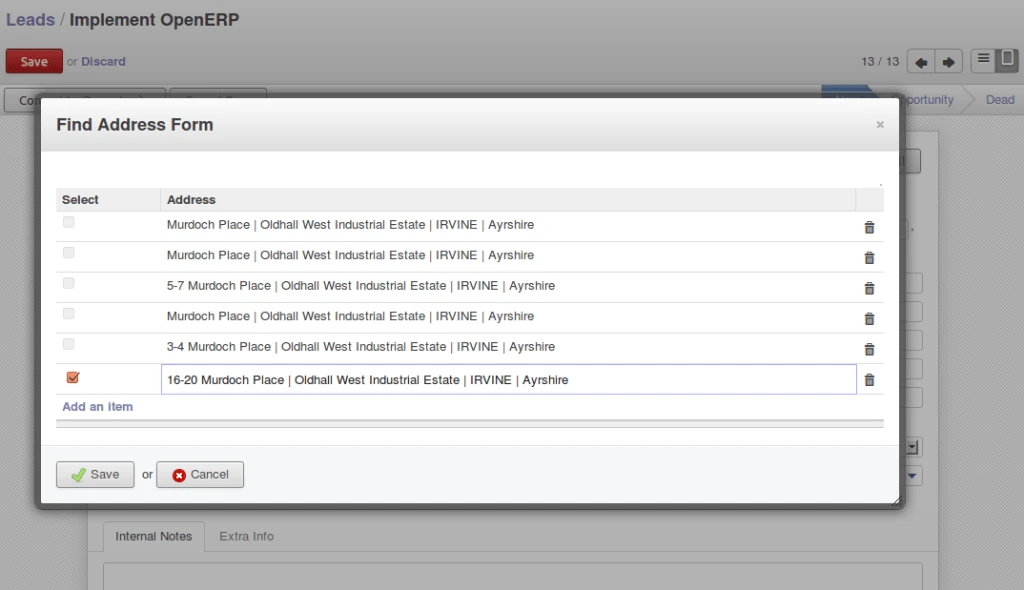
CraftyClicks adderss list from lead
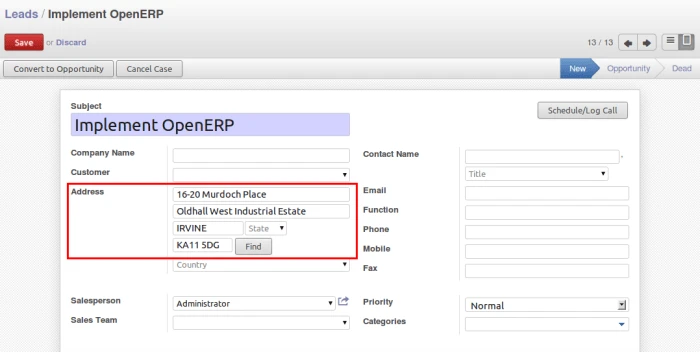
Lead after select address
User can find same services available on another website which is giving same result for address lookup based on postcode.
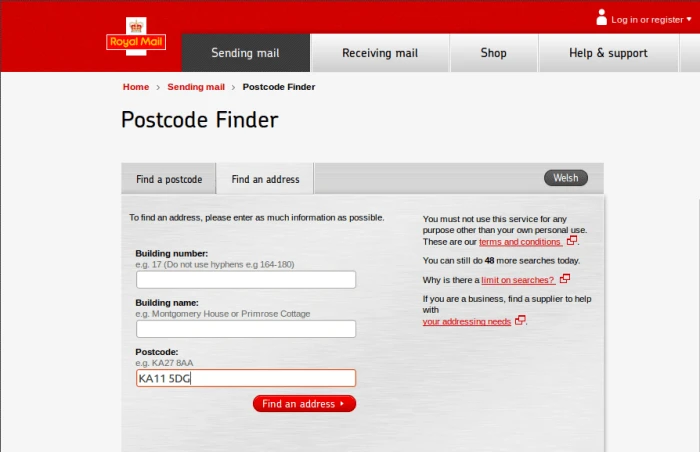
Address from royalmail.com

Website address list from royalmail.com
OpenERP Barcode Reports (Small Barcodes)
We have implemented another barcode report with size 4.3cm X 3cm. It is printing one barcode on each page based on quantity available of selected products.
User can select pricelist and currency as optional to print on barcode.

OpenERP Barcode Report
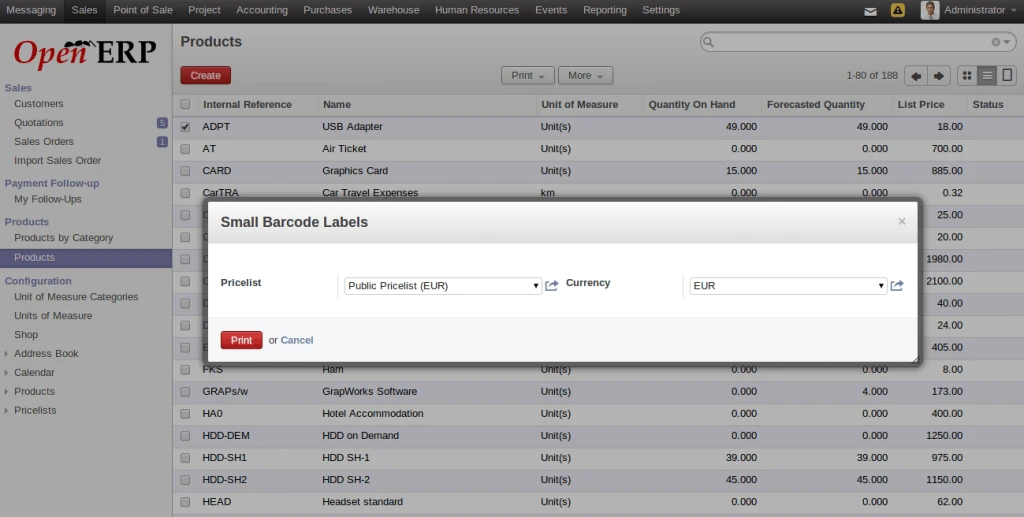
Barcode Option
This is example of product which has 49 available quantity into stock.
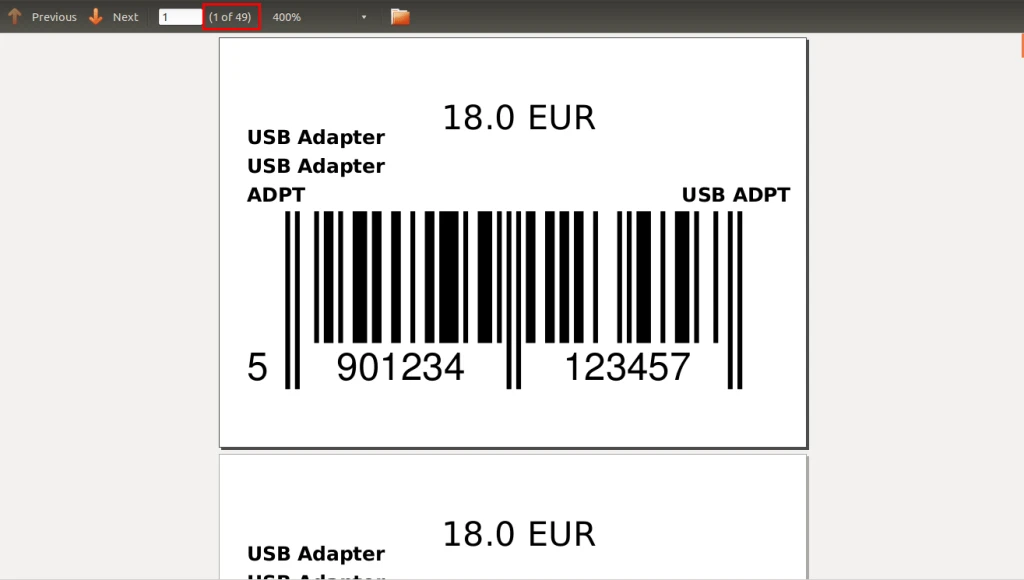
Barcode PDF
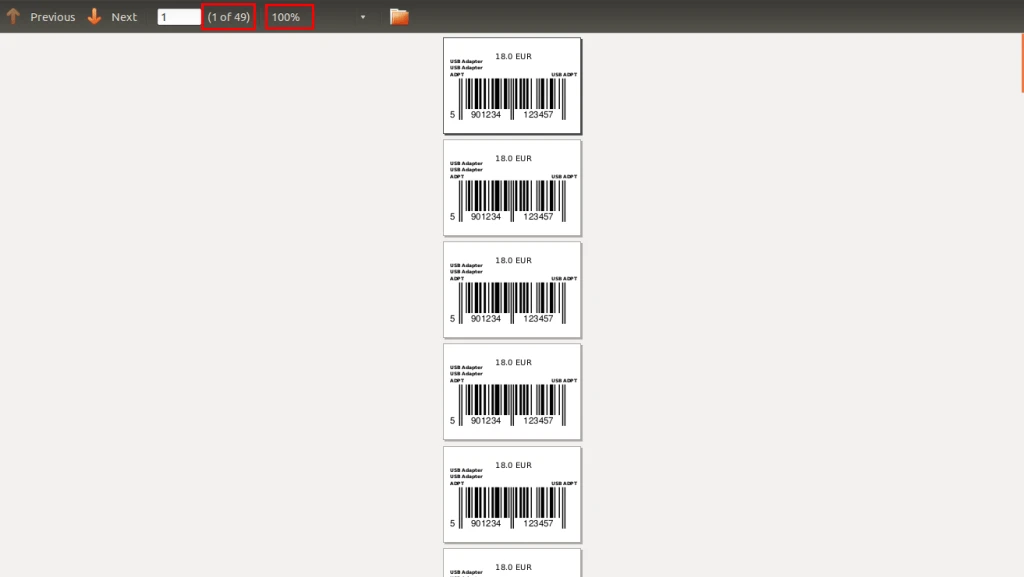
Barcode PDF
This is actual printing of barcode on paper.
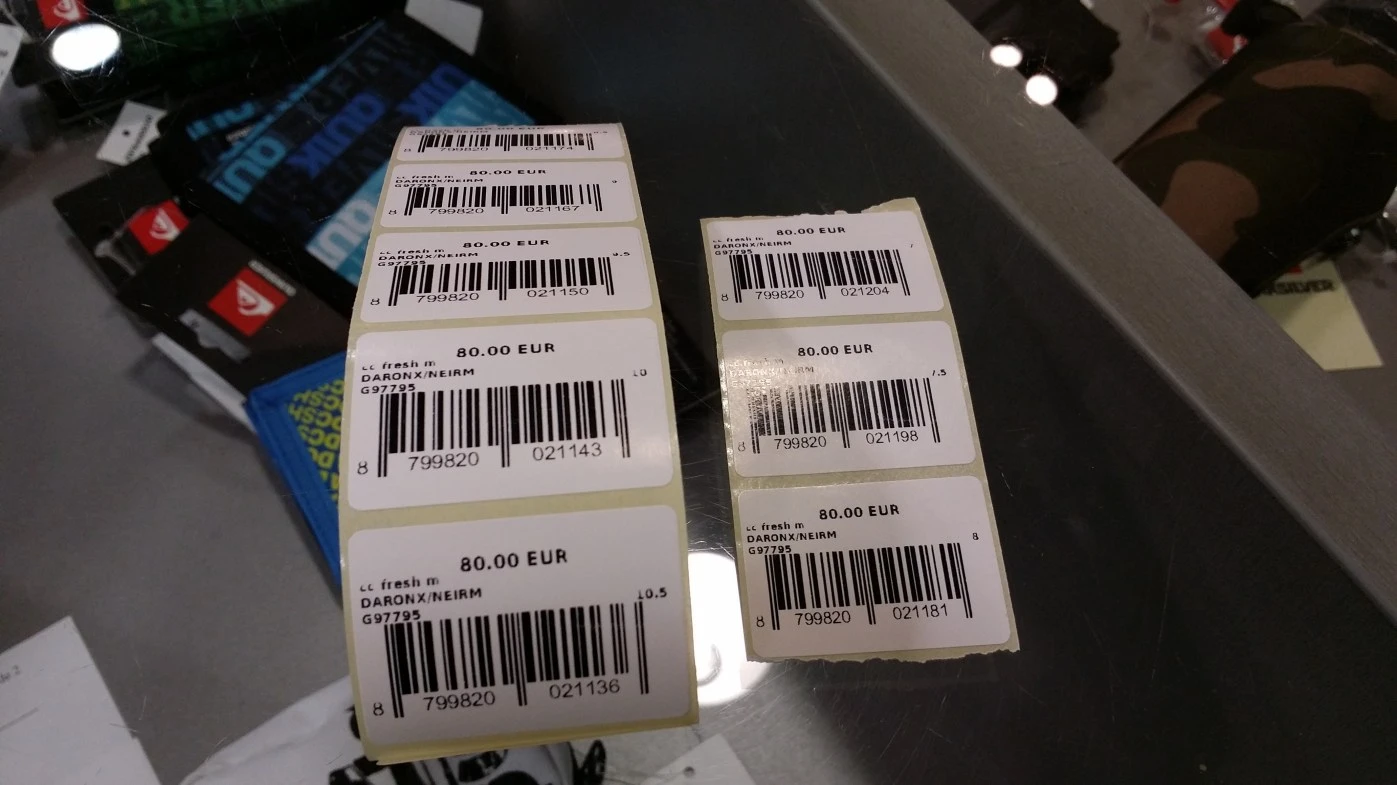
Live barcode print
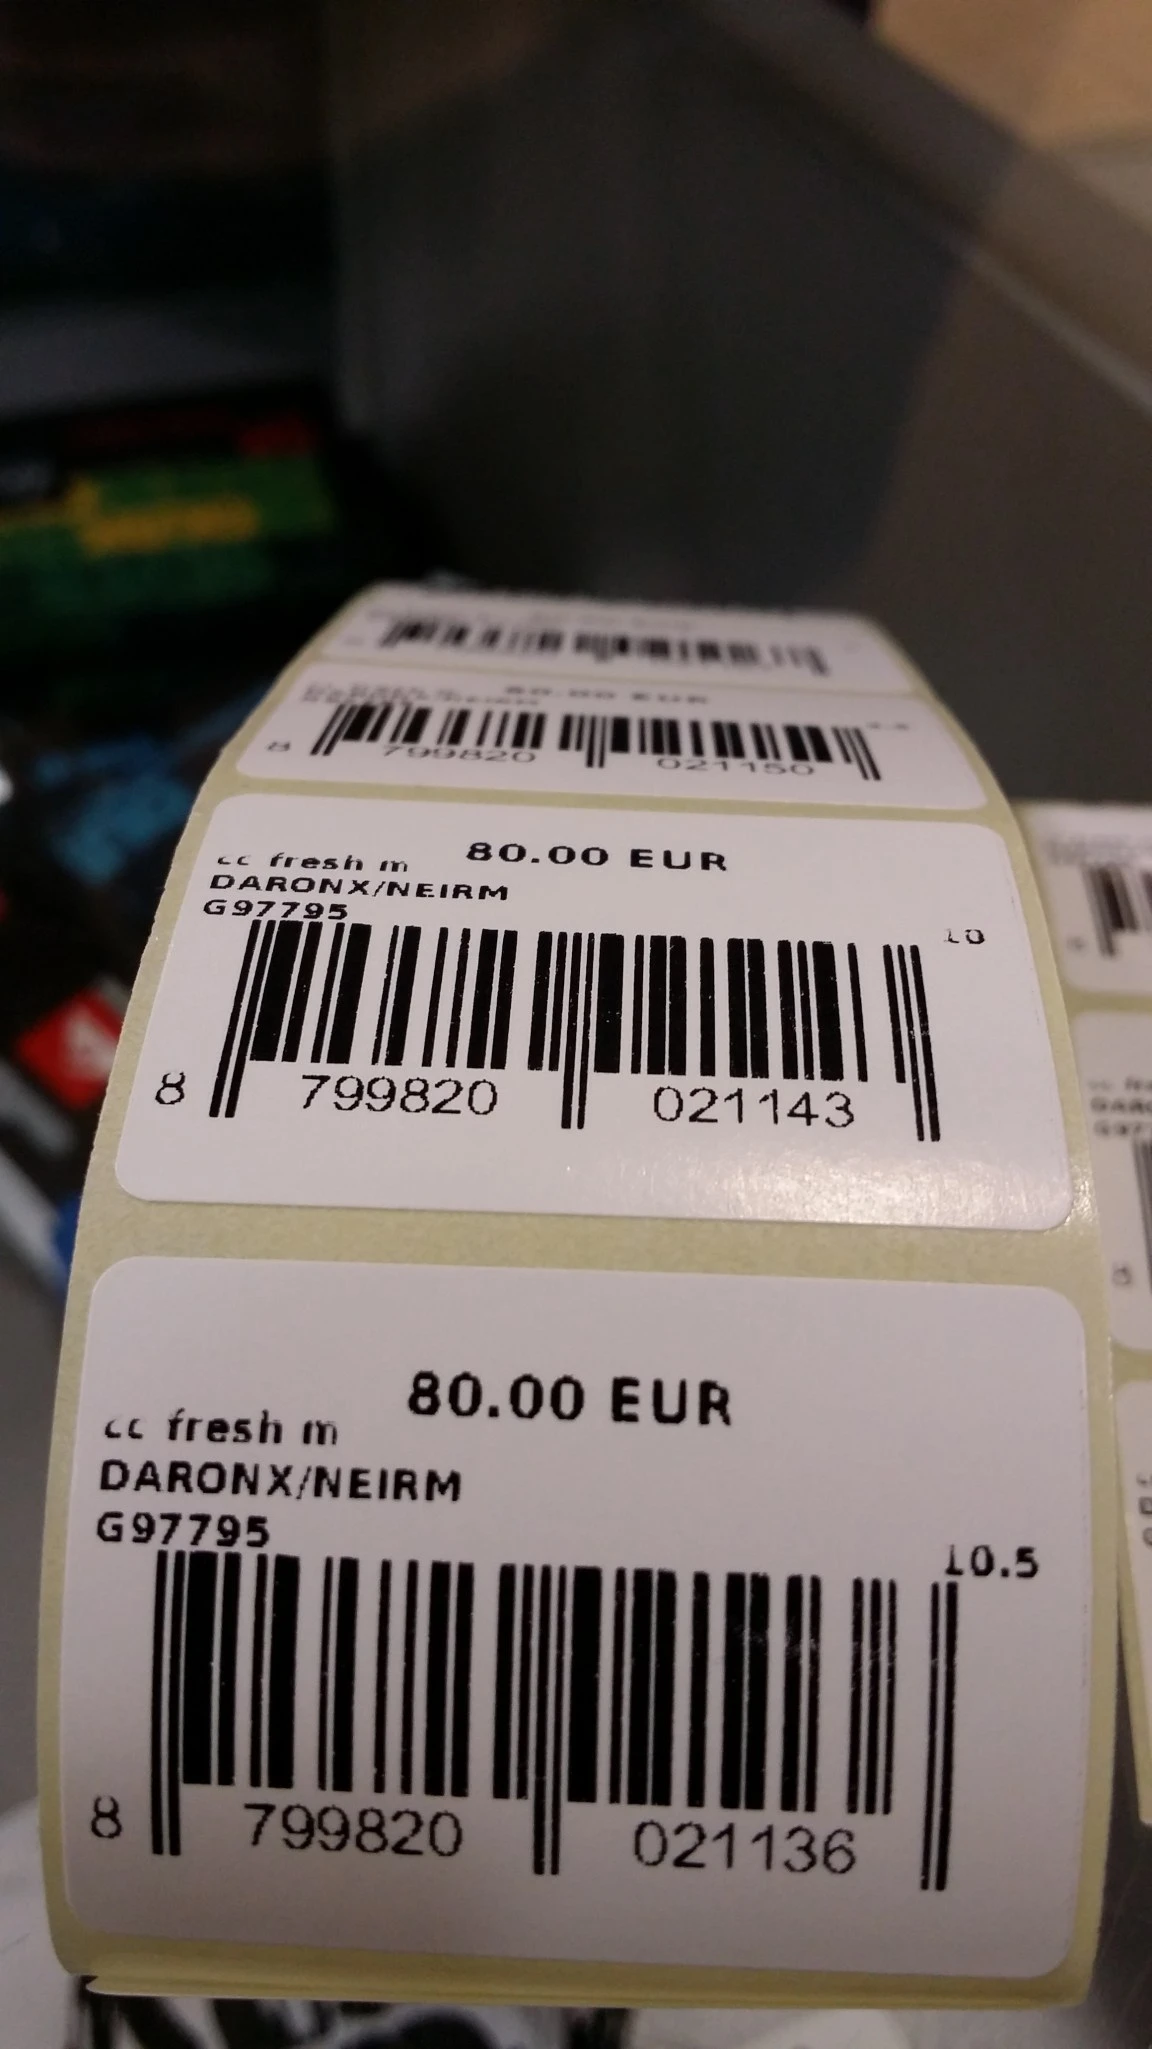
Live barcode print
OpenERP Product Barcode Report
Lets discuss about Product Barcode Report in OpenERP where you can print 40 barcodes in A4 page with user define currency and pricelist. And it is mainly work on available quantity of product in stock.
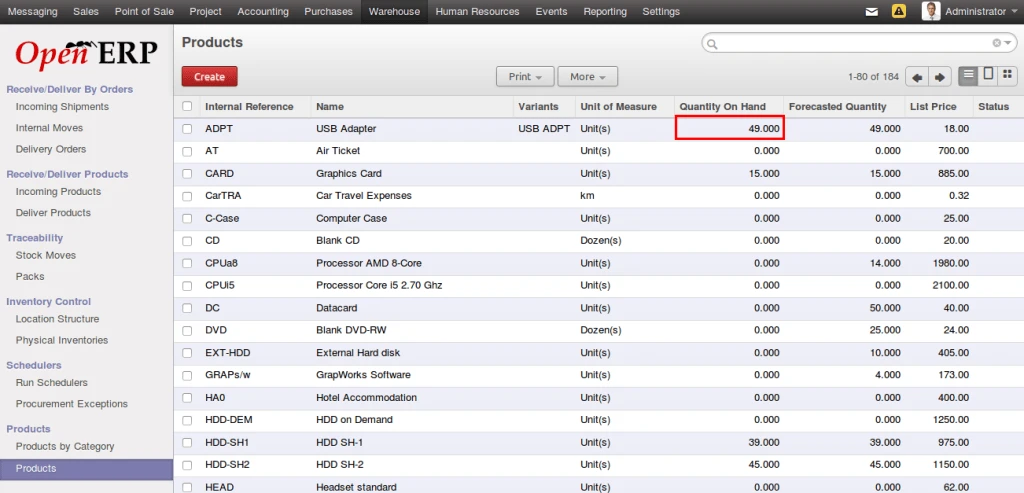
OpenERP Product Information
For that we have created new report in Product.
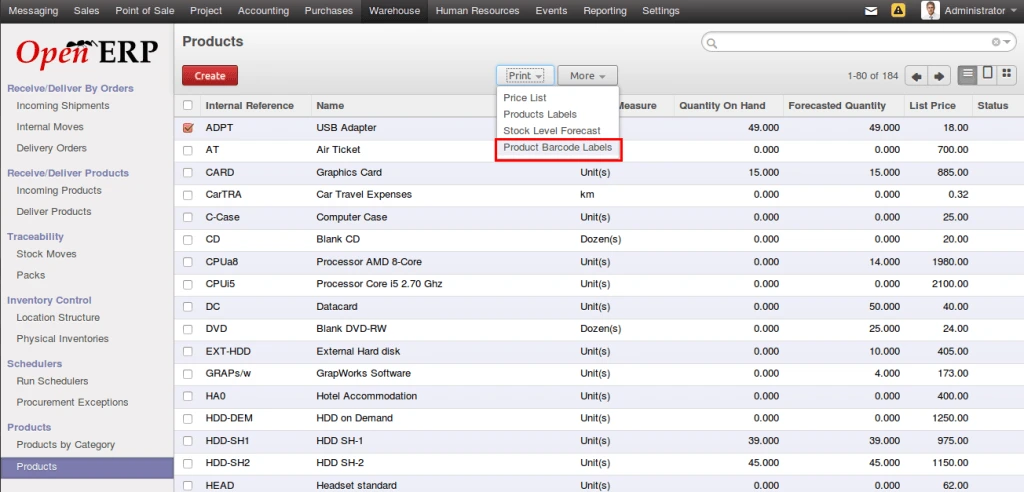
Product Barcode Report
It will popup small window with some parameters.
Column : From which column you want to start printing
Row : From which row you want to start printing
Pricelist : Select sales pricelist
Currency : Select currency that print with price on barcode
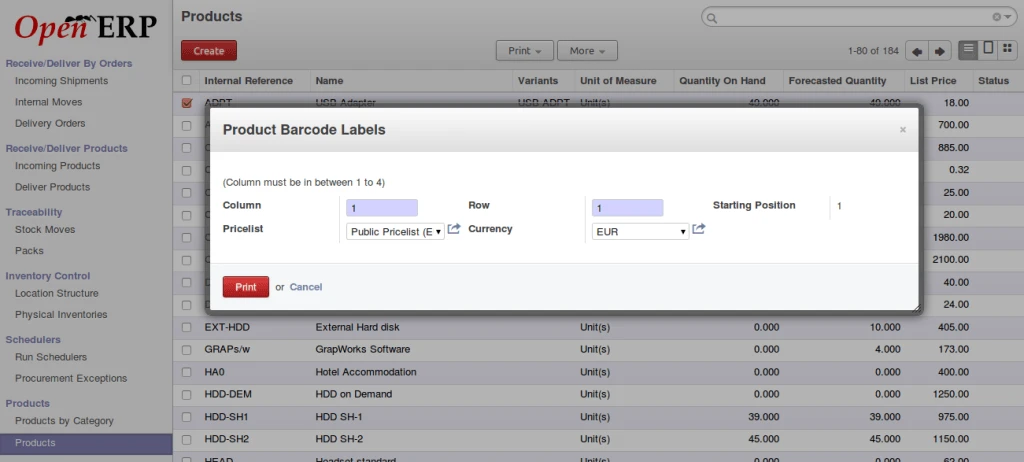
Product Barcode Options
This is a report of product barcode.
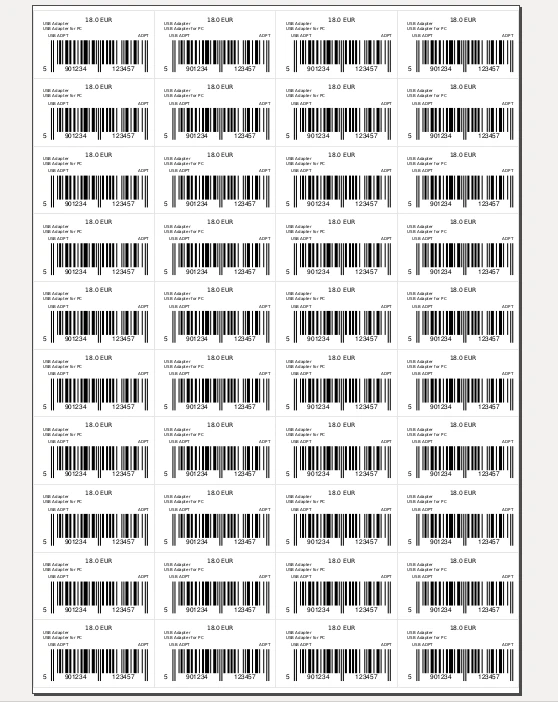
Full page with barcodes
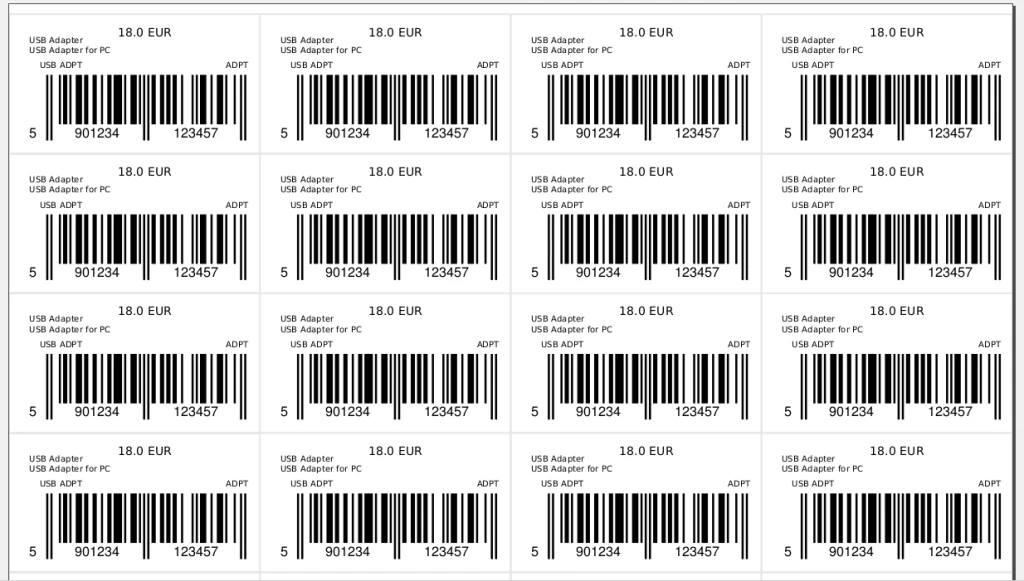
Close look of product barcode
You can start printing barcode from any row and column on PDF.
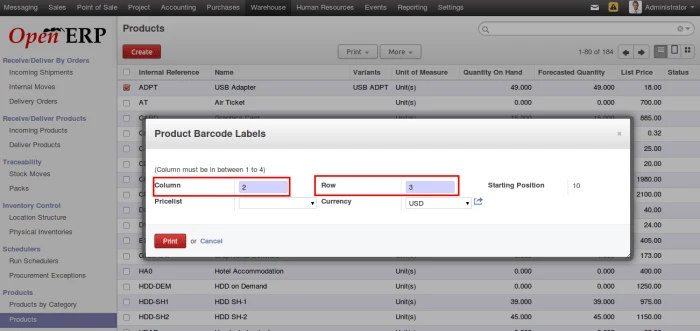
Print barcode options
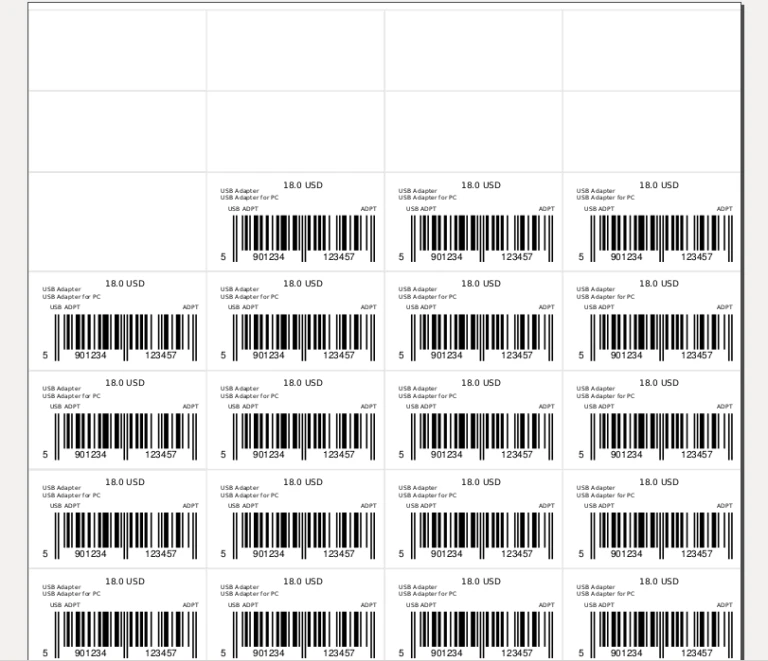
Change barcode position
OpenERP Point of Sale: Gift Coupon Feature
Video link for this feature:
Enhancement in OpenERP Point of Sale for Gift Coupon feature.
This feature is very important when we are dealing with gift coupons in our routine life.
Lets see how this is working.
First of all we have to create coupons in OpenERP as a normal product but having Coupon option true.
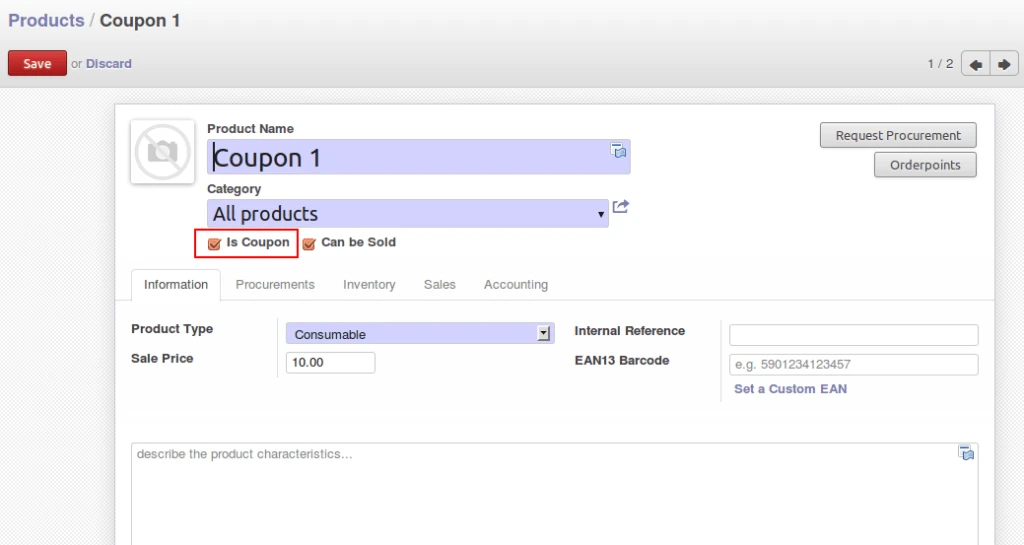
New Coupon
In below screen we can see that only products having quantity > 0, and with 2 options for coupon feature. Create coupon from POS is also possible, and Show all coupons.
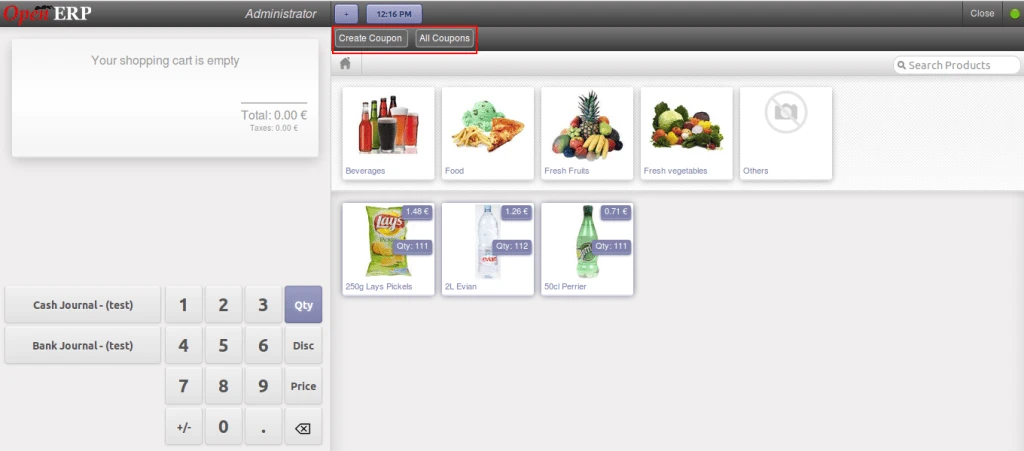
POS Coupon Options
This view is to create coupon from POS. We can define validity periods so dates will be automatically calculated.
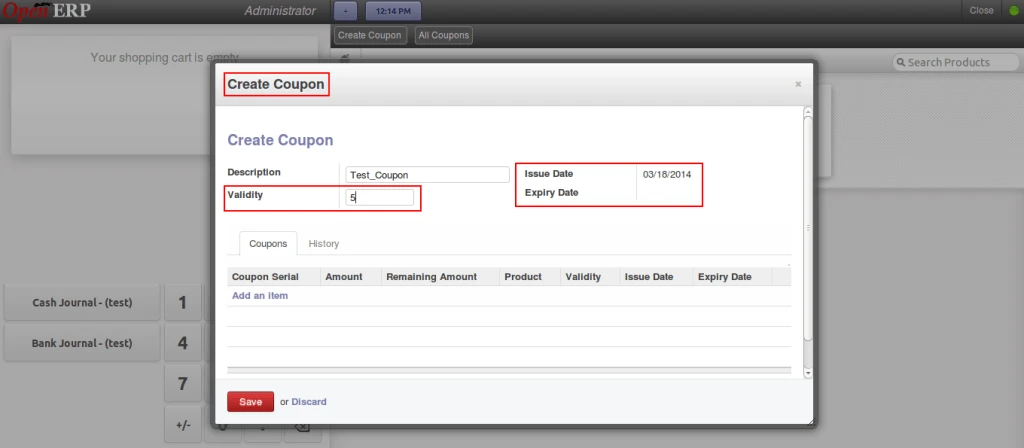
Create Coupon from POS
Once we create coupon, POS will load all products having Coupon = True. So these coupons can be allocated to our customers.
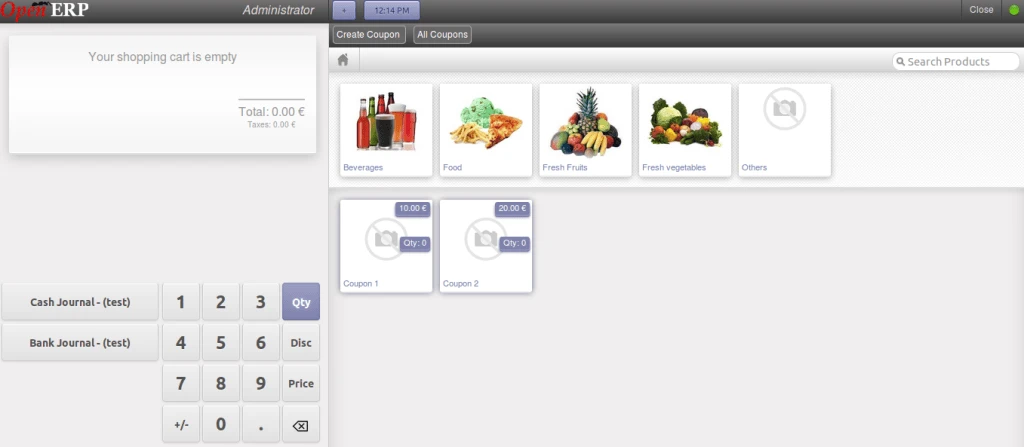
List of Coupons
We have receipt with barcode, and other information like expiry date and all.
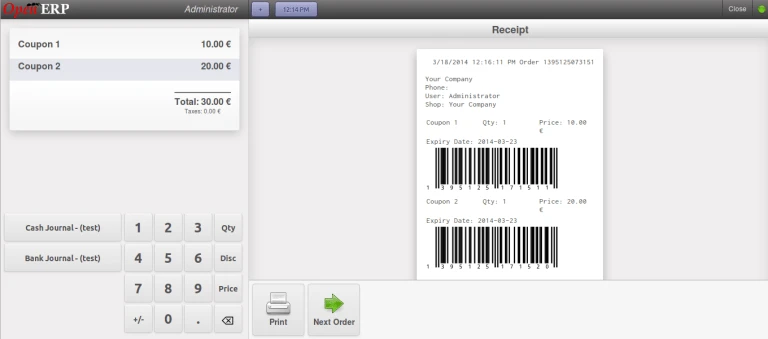
Barcode on Receipt for coupons
Here is the list of coupons when we click on “All Coupons”, but with condition that validity should be greater than today, and remaining balance also should be bigger than 0.
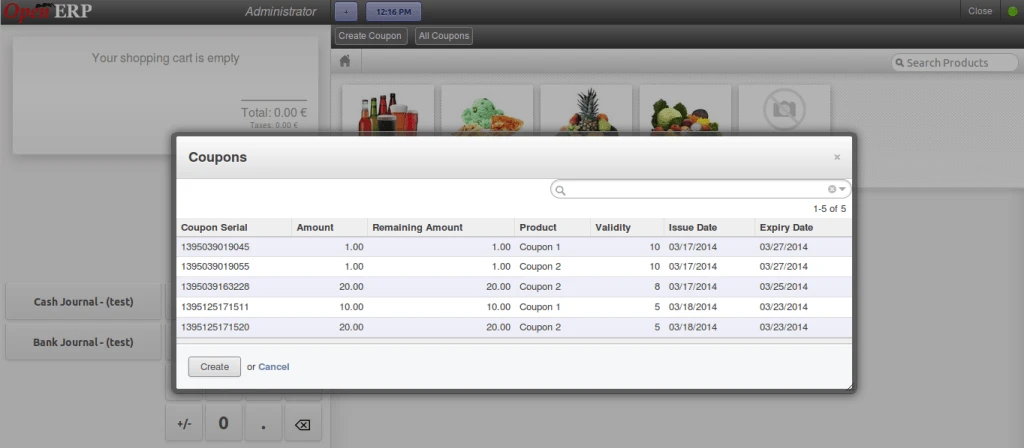
All Valid Coupons
Now we have another option in the backend to check created coupons and history.
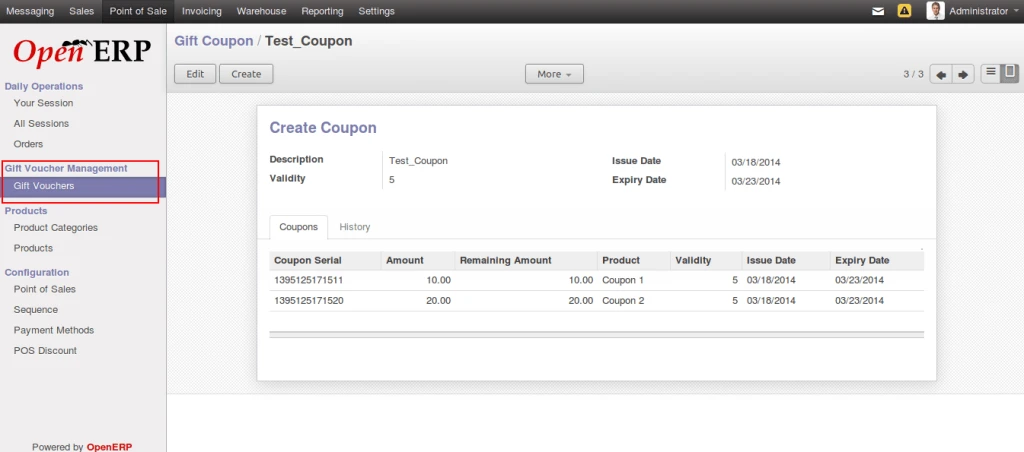
Created Coupons
Now lets see how to use this coupon during POS payment. Here we have option to add multiple coupons and immediately available balance will be appear as soon as we select coupon barcode number.
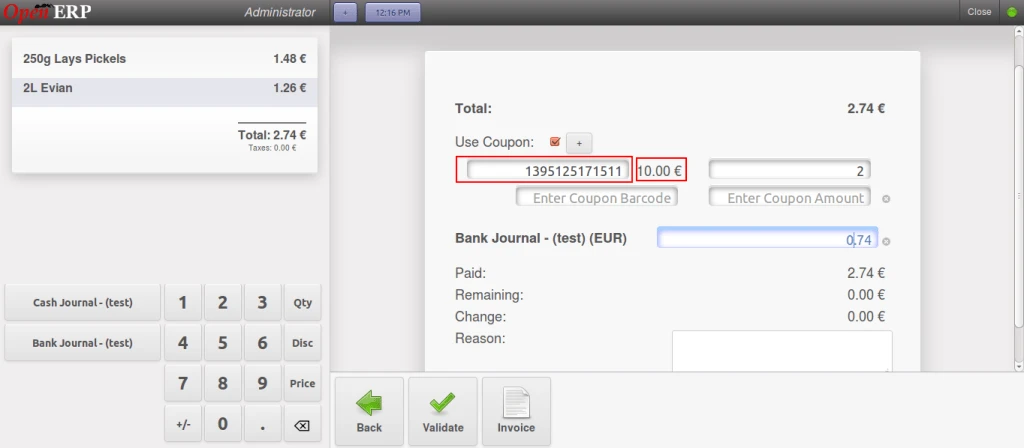
POS Payment
with coupons
Once we process for payment, so coupon amount will be appear on receipt also.

Coupon amount in receipt
Now in the backend, we can see remaining balance is decreased.

Remaining balance
We have history also maintained here which are actually used on particular date with amount.
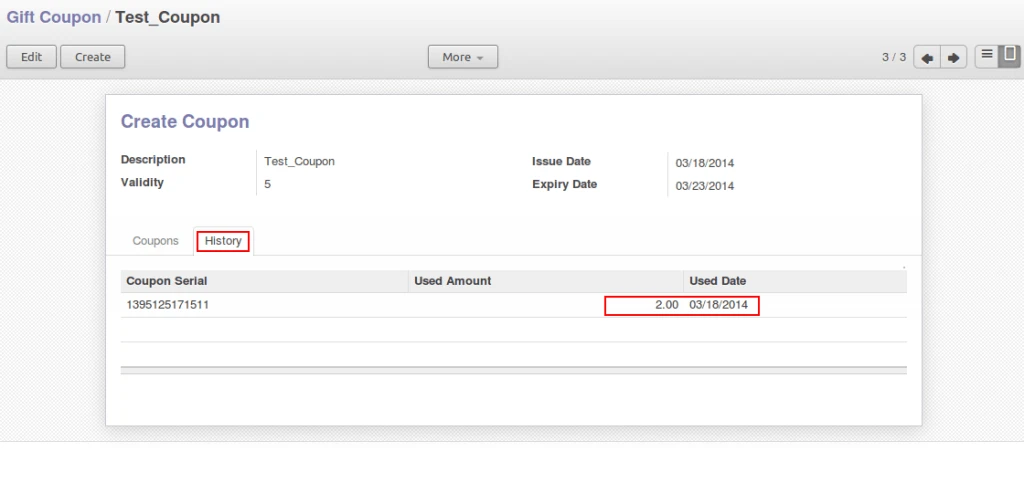
Coupon History
Now if we try to use amount which is bigger than available balance in coupon, then also POS will not allow us to do that.
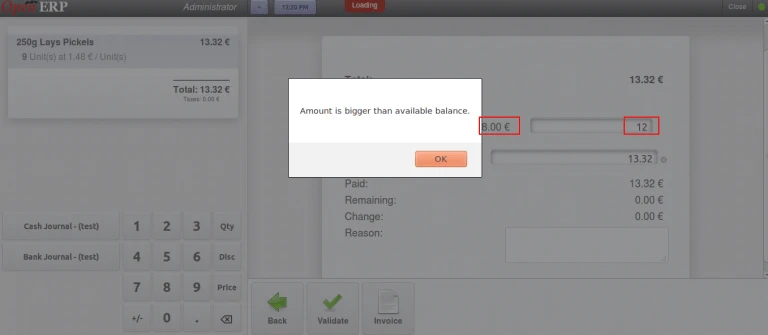
Bigger Amount
More developments are on the way…
Contact: [email protected]
Skype: acespritech
OpenERP Enhancement for product quantity in different warehouse
One more enhancement in our module “Product quantities in different warehouses” by adding more features.
Here is the old blog version:
V1 – Product Quantity in different Warehouse
V2 – Product Quantity in different Warehouse
So lets start again for new features.
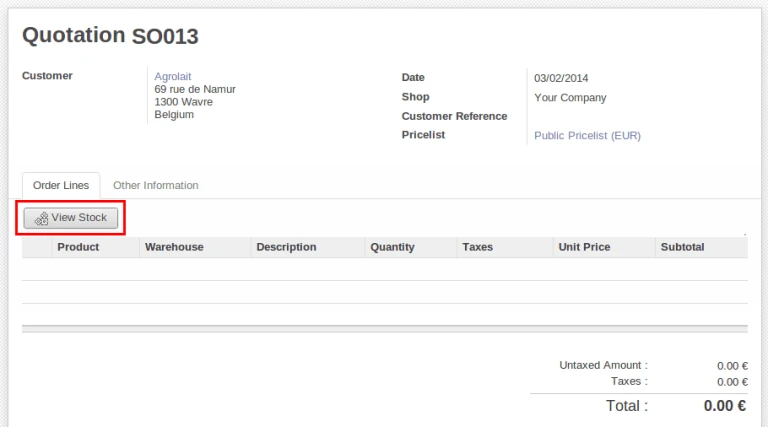
OpenERP Sale Order
Once we click on “View Stock” button, it will open popup window where we can add multiple products by checking their quantities at different warehouses.
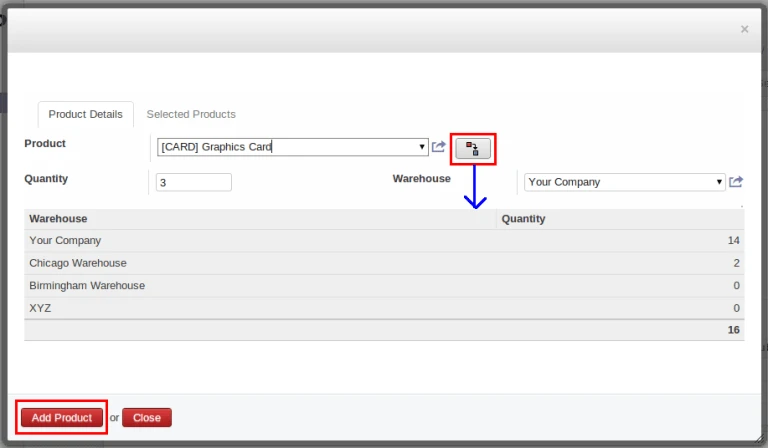
View Product Stock
There is a great improvement that when user will click on “Add Product” button, popup window will not close so user will add multiple products and “Selected Products” Tab will display that how many products still now added into order line.
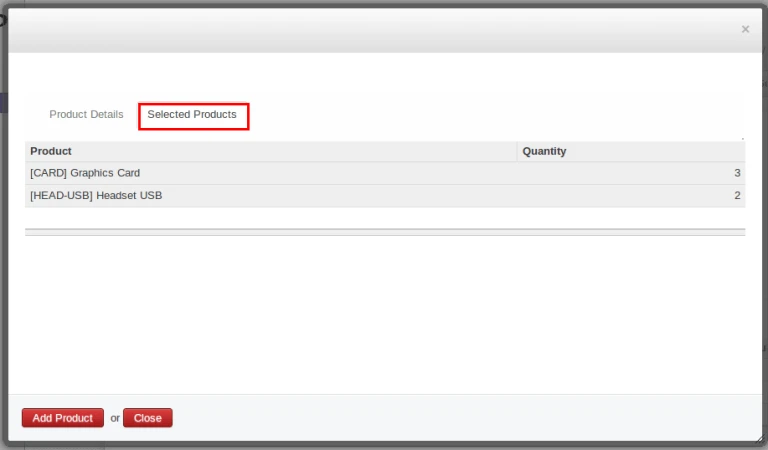
Selected Product
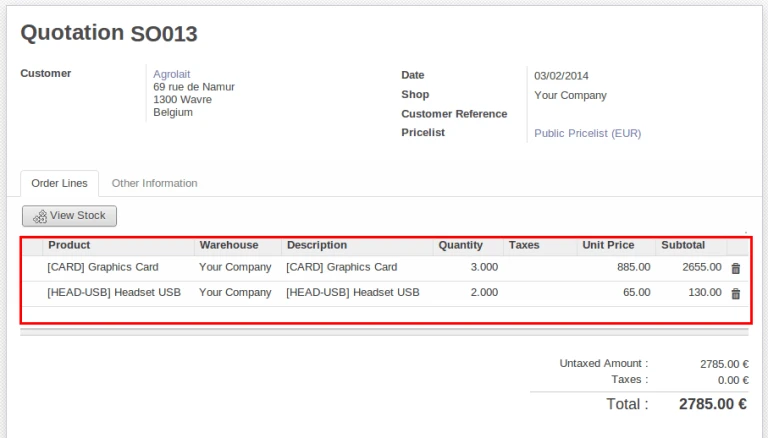
After Adding Product
During Internal Movement of stock it is very important to know which warehouse has how much stock for moving it from one warehouse to another. To make this work easy, we have added feature into “Internal Move” of OpenERP.
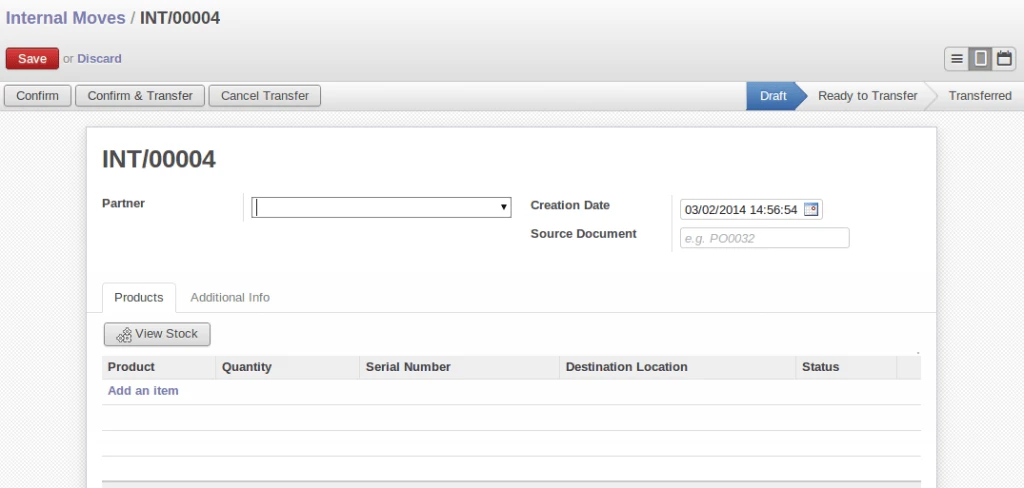
OpenERP Internal Move
We can select Source Warehouse and Destination Warehouse for each product separately during internal move.
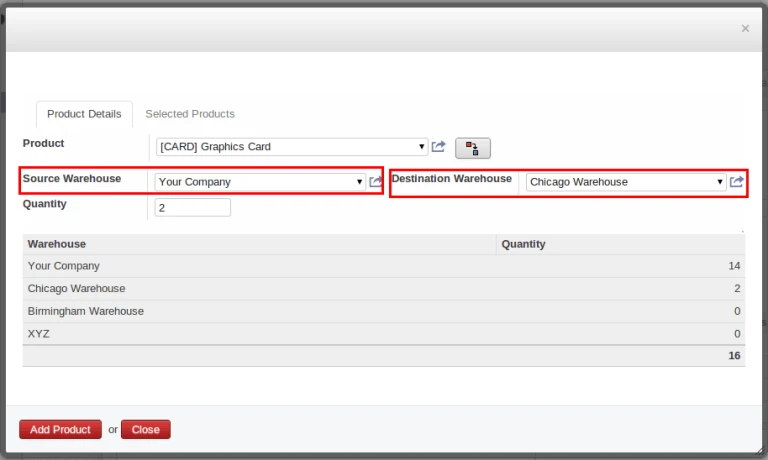
Popup product move
And user can also know that how many products (with warehouse) selected till now for internal move process.
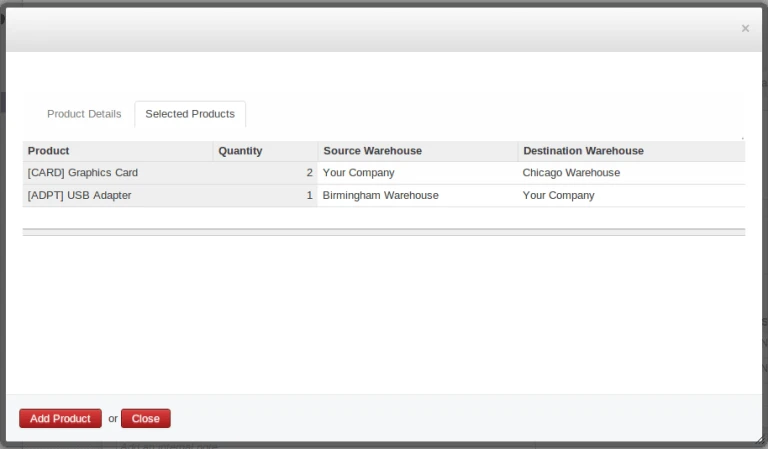
Internal Selected Product
We can see that each move line has source and destination location according warehouse select into popup window.
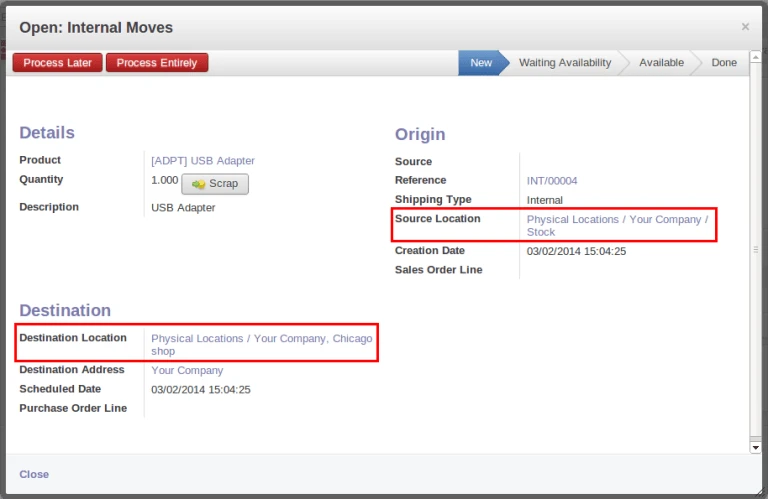
Internal Stock Move
OpenERP Point of Sale: Restriction on return products from backend
For the moment, in OpenERP POS Back Order, we can return main order N times and also perform return operation on “Return Order”. Here we have improved some functionality and added new features like :
- Display Remaining Qty in main POS order
– Not allow to return which is already Returned.
– Not allow to add new product in “Return Order”
– Not allow to change product in “Return Order”
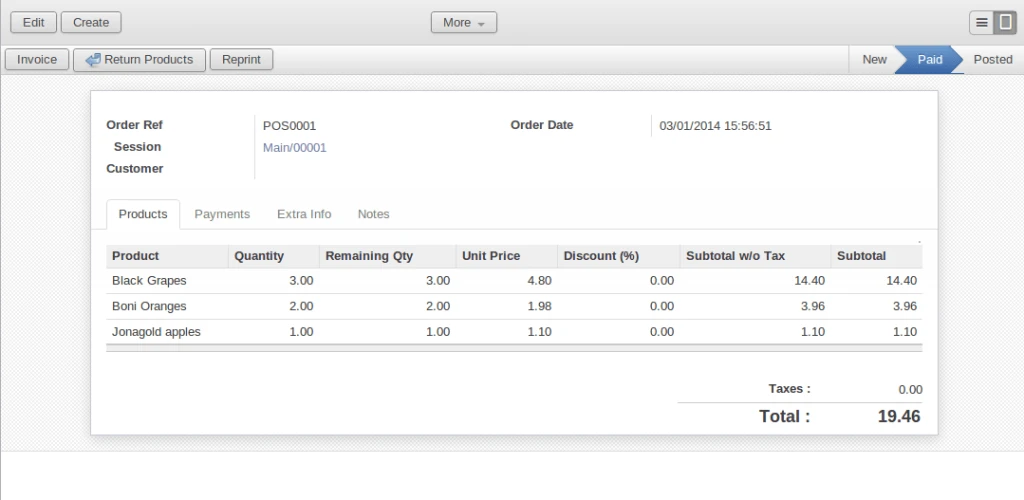
OpenERP POS Order
Once user will click on “Return Products” button from Main POS Order, it will open new window with all lines like below. As we can see there is no “Return Products” button available into “Return Order”.
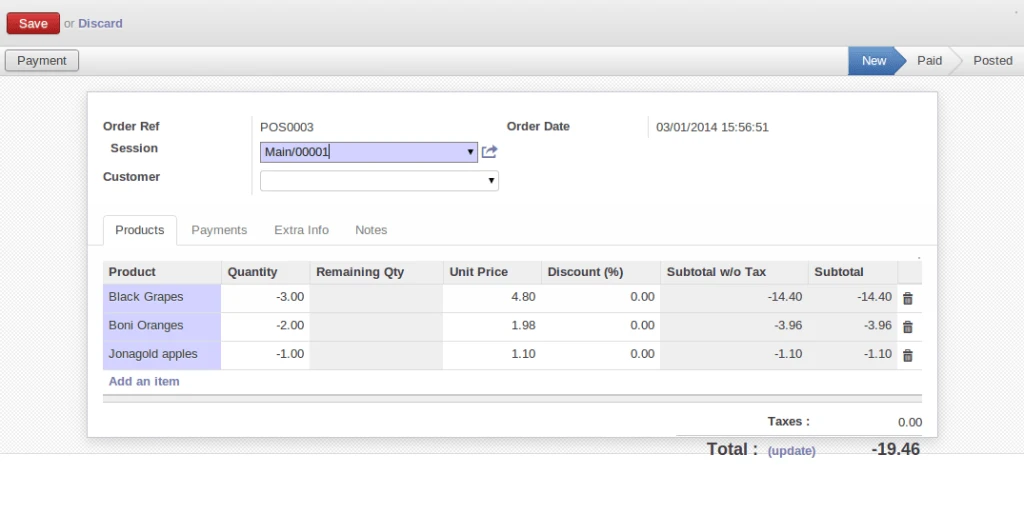
POS Return Order
This is an example that after creating “Return Order”, there are only few products exist.
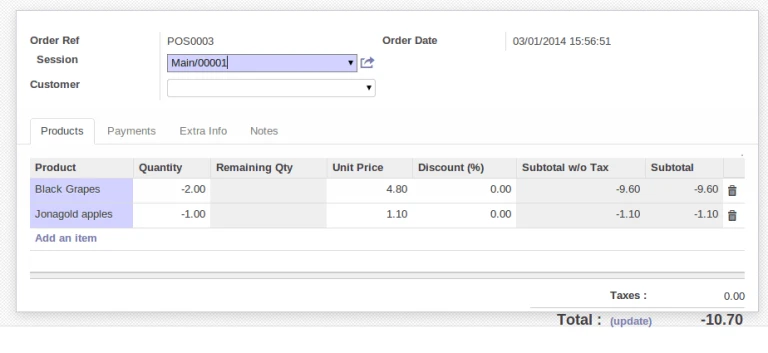
POS Return Order
After creating “Return Order”, we can check Remaining Qty into main POS order.
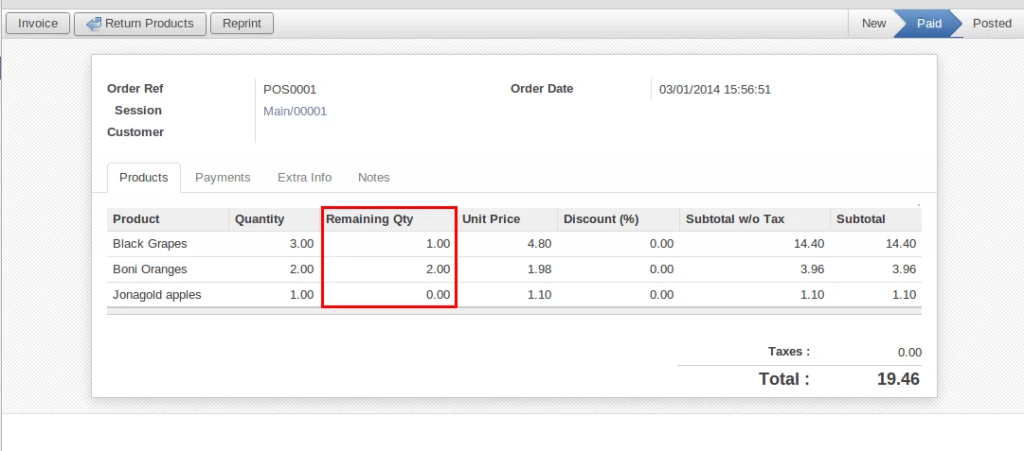
Main order after return
We are restricting user here for adding more quantities than what is Remaining in Main order.

Change qty error from return order
User can not add new products into “Return Order”.
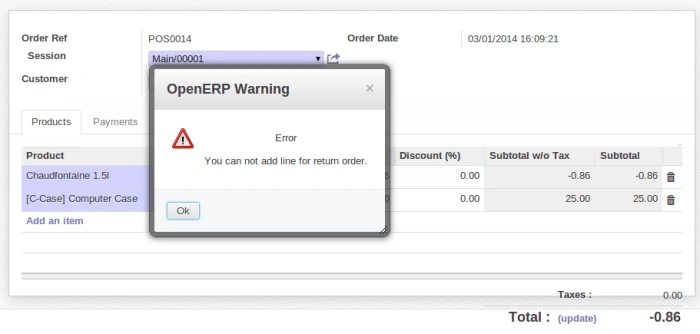
Restriction to add new line in return order
User will get following message when trying to save “Return Order” by modifying column other than “Quantity”.
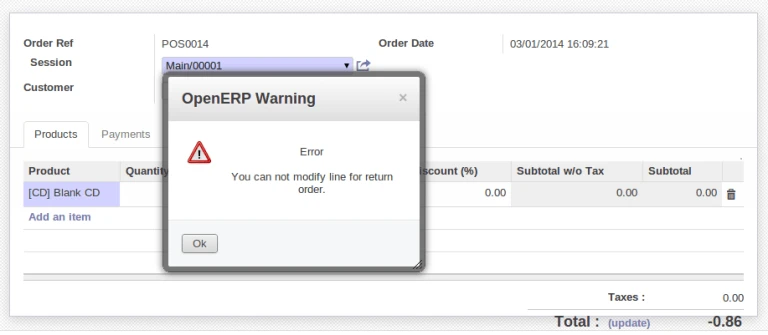
Change return line
After returning all products from Main POS Order, “Return Products” button will be disappear.
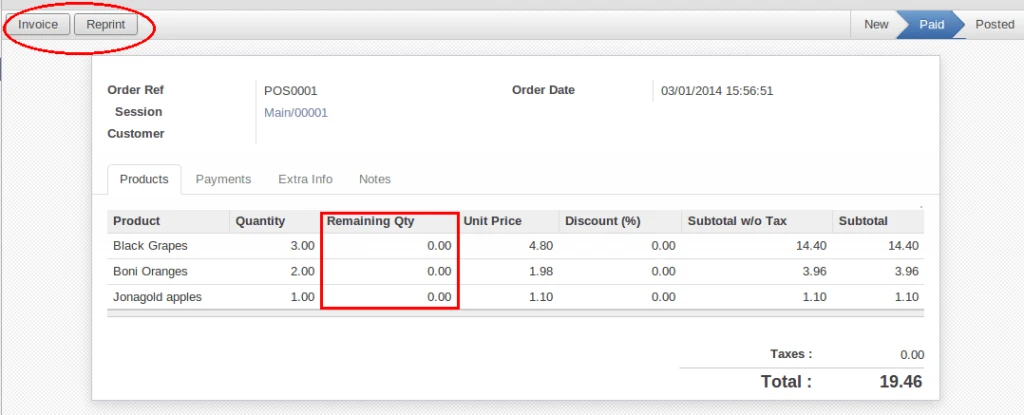
Can not return on main return order
Authorize.net (eCheque) integration with OpenERP
As we have already posted one blog for Authorize.net feature integrated with OpenERP. http://acespritechblog.wordpress.com/2013/11/26/openerp-integration-with-authorize-net/.
After this development we have implemented eCheck feature for authorize.net integration with many other imporvemets. In newer version, it will be possible to add more than one credit card numbers for customer. And it is also possible to insert new credit card information during payment process.
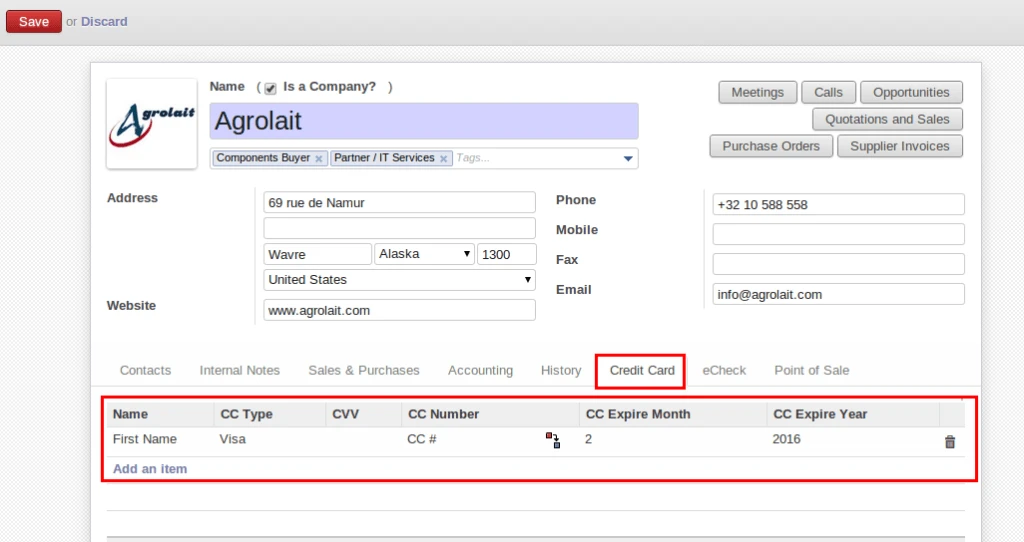
Credit Card
Same as credit card, user allows to enter more than one bank information of their customers and can create during payment process.
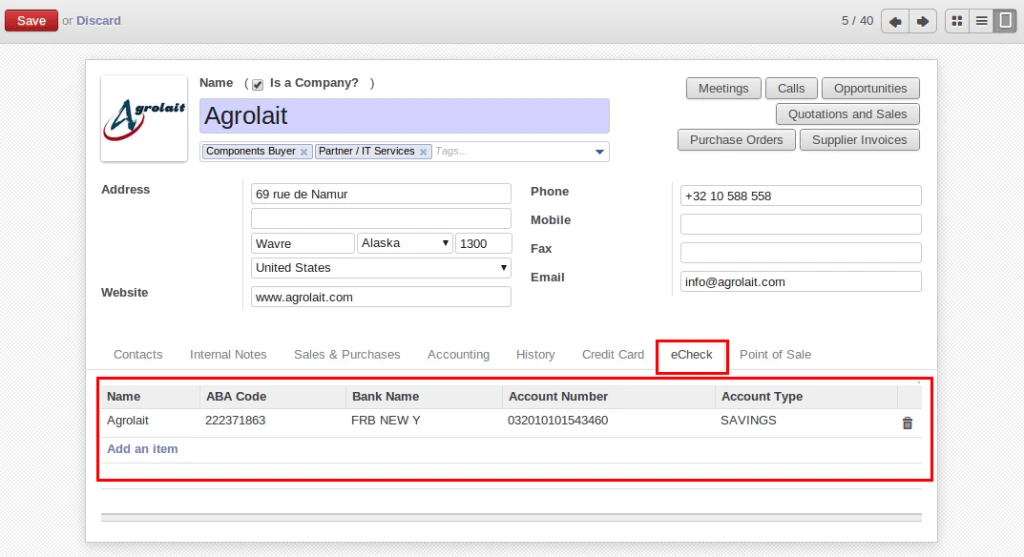
eCheque Configuration
Here we have made major improvements compare to older version. User can select better option for payment request from popup window like ‘Credit Card’ or ‘Bank’ and related options will also be appear.
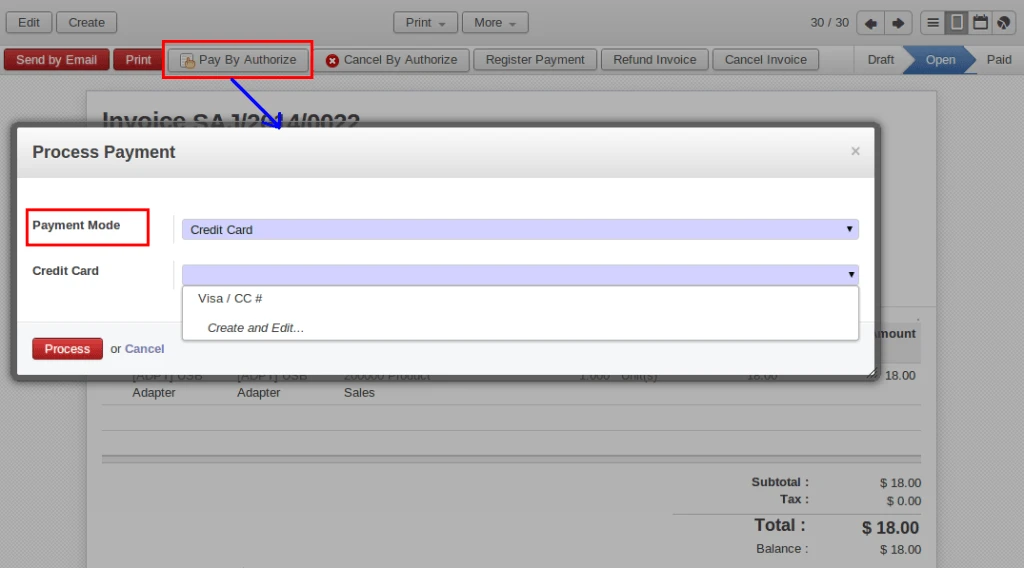
Credit Card Options
There are other methods also available with eCheck but Authorize.net Test account allow to make testing with below two methods only.
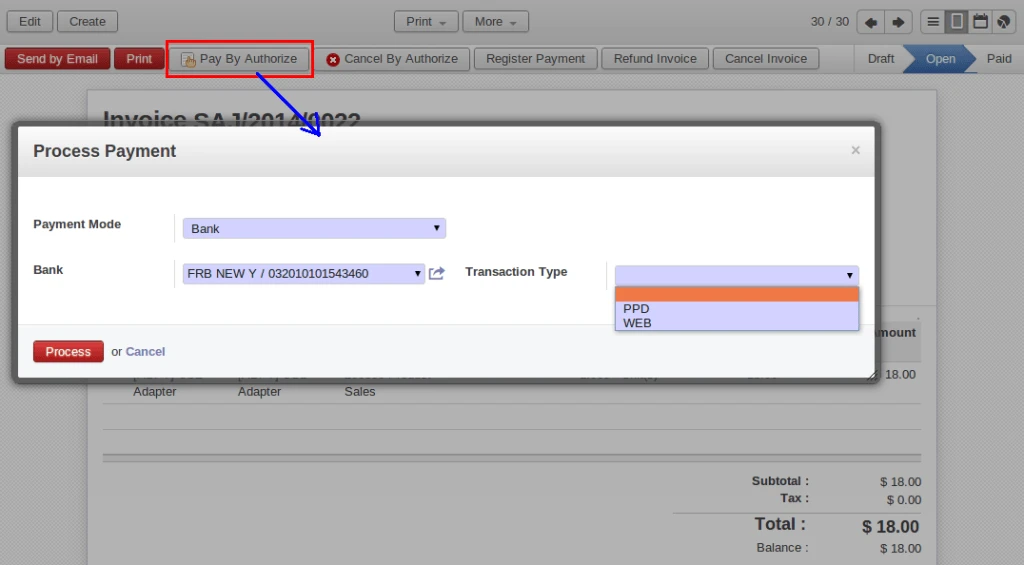
Bank Options
After make payment request with eCheck, authorize.net server gives some response.
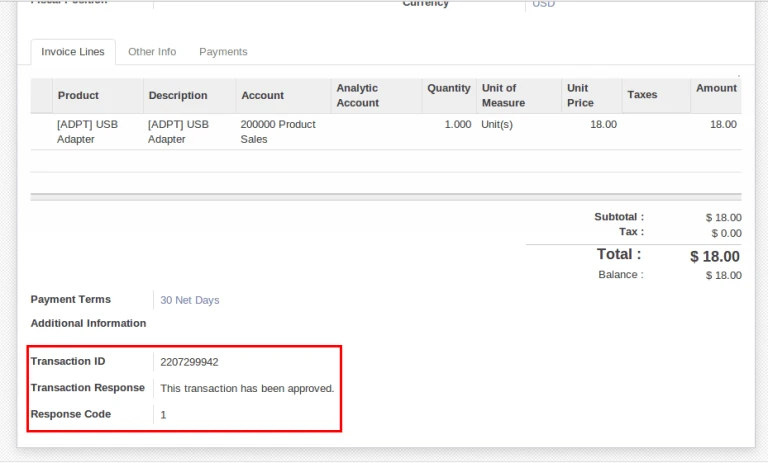
eCheque Response
We are keeping histrory of each and every transaction with response that generates with Authorize.net.
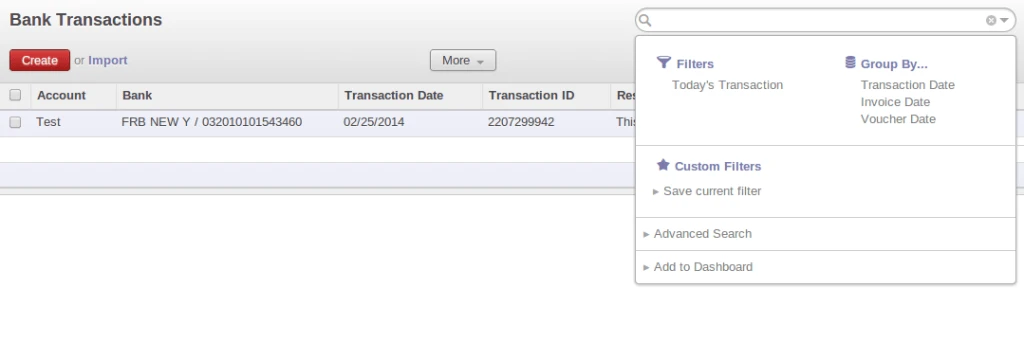
Bank Transaction
It is very easy to STOP payment which is already sent to authorize.net for further processing.
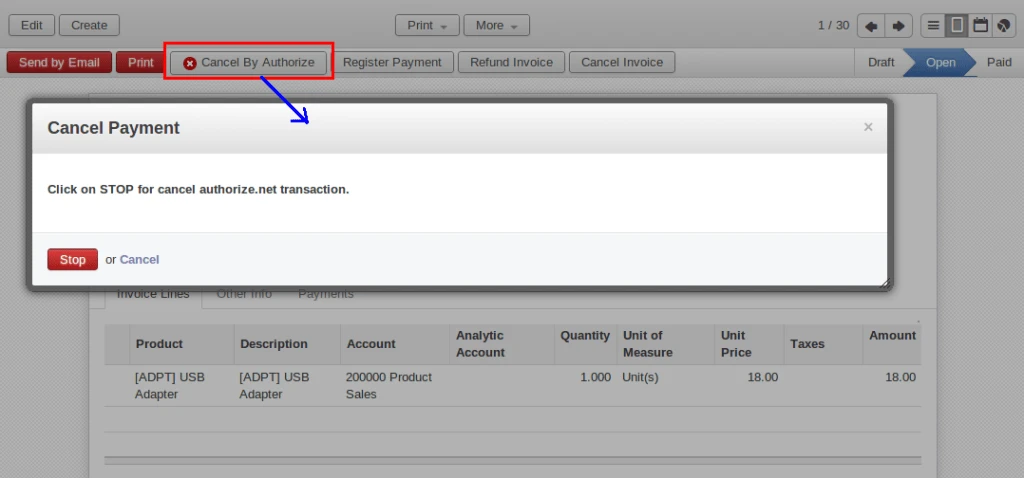
Cancel Authorize
And once transaction will settle with authorize.net, you can refund it with any amount.(less than Invoice amount).
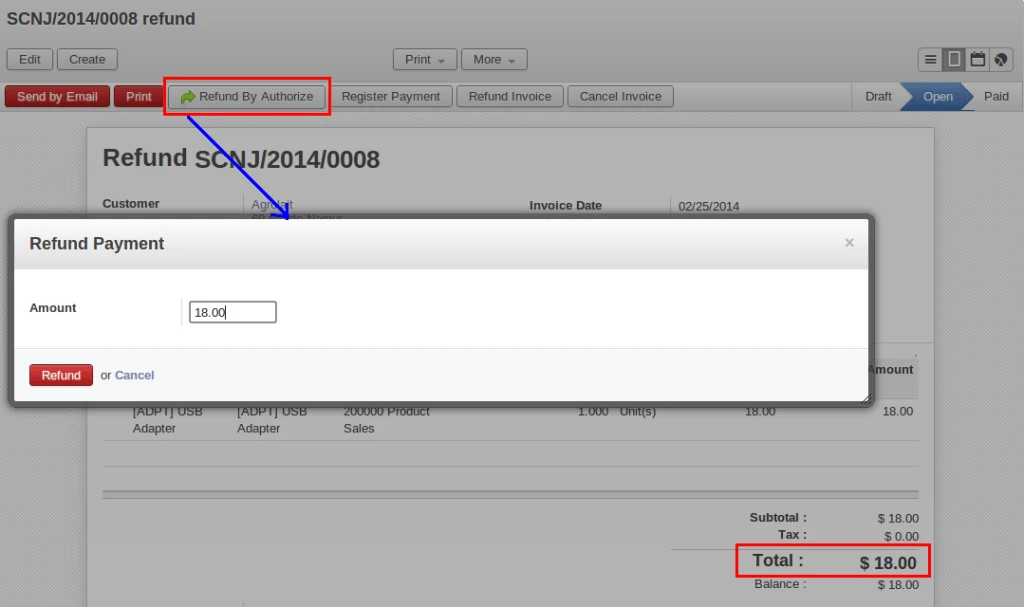
Refund Authorize
OpenERP Point of Sale: Product Quantity in different warehouse, Discount restriction by password
As we are developing new features in OpenERP Point of Sale, here are some more important features that we have implemented in OpenERP 7 Point of Sale.
In this blog we can see following features:
– Enhancement in discount restriction using password
– Display product quantity in different warehouse from POS.
Here in below screen we can see that we can define maximum limit of discount and password.
We can also define users, and point of sale who can access this discount features during point of sale operation.
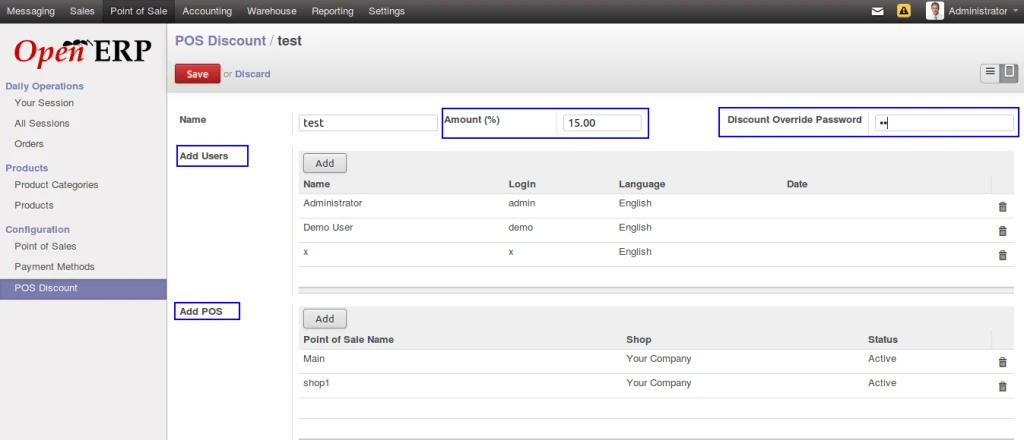
POS Discount
This is a normal screen from where we can define discount and right now we can see that we have displayed products which have quantity > 0.
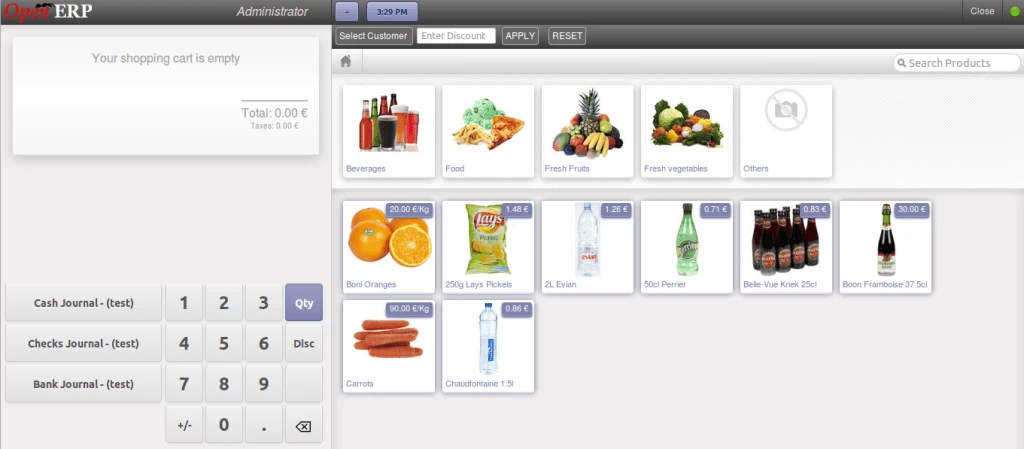
OpenERP POS
Now when we click on any product, so immediately we will have this kind of view, and we can see big image of that product and we have a link here “Details”, which will open warehouse list with number of quantity of this particular products.
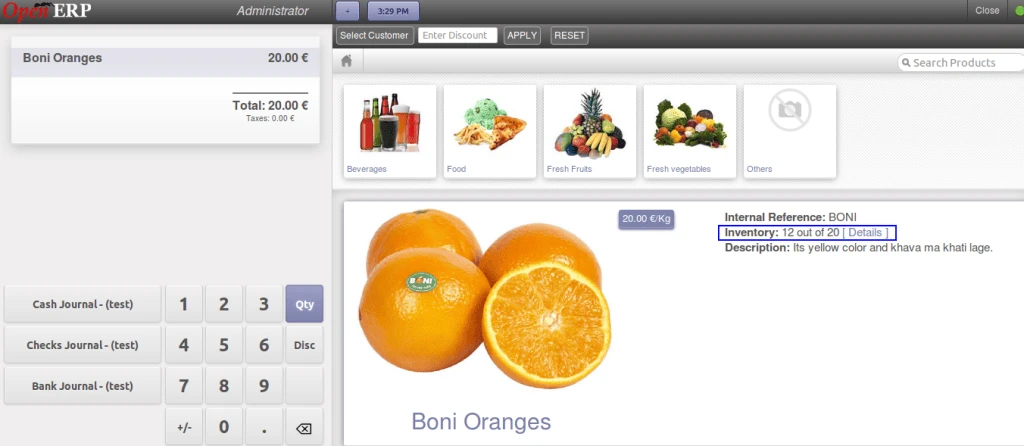
POS Big Product Image
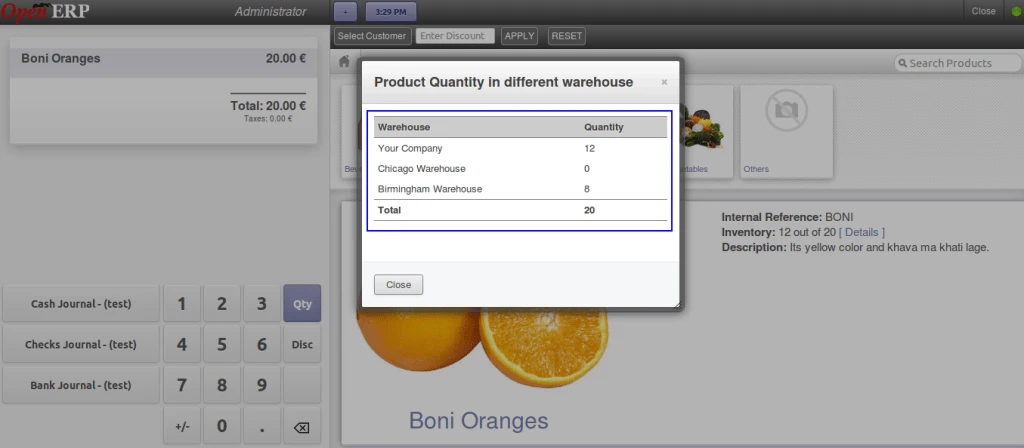
Product quantity in different warehouse
For discount to be apply on all products in the order, we can enter amount in this field.
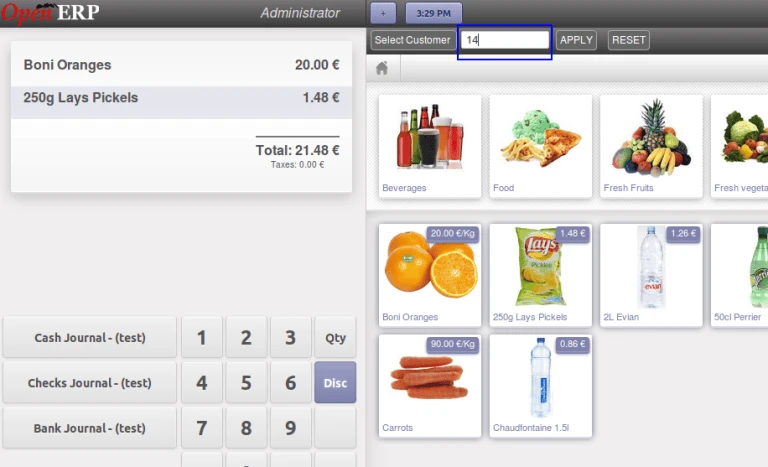
Apply Discount
So we have discount applied on all products in the list.
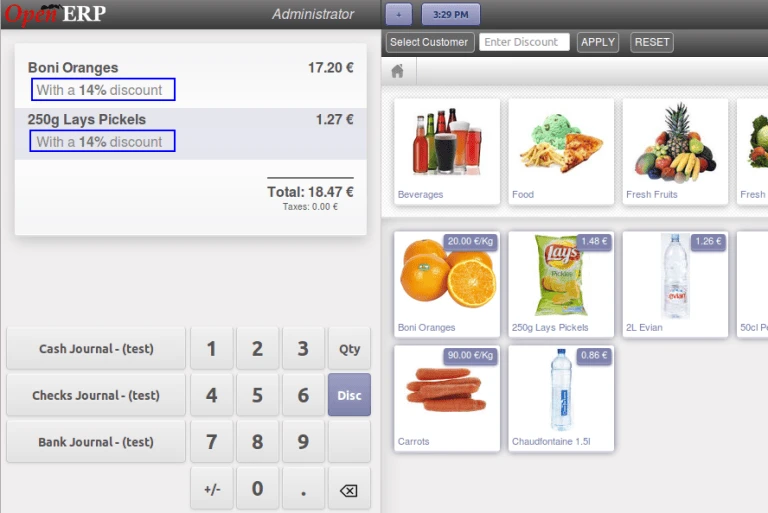
Apply Discount
If user is trying to enter discount more than given limit, then it will ask for password, and if password is correct then only given discount can be applied.
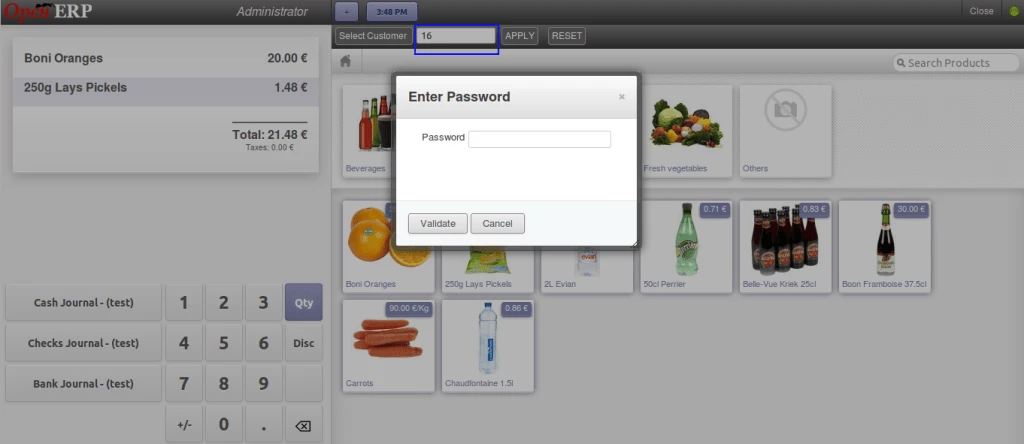
Apply Discount with Password
Here is the receipt which has discount amount displayed with each products.
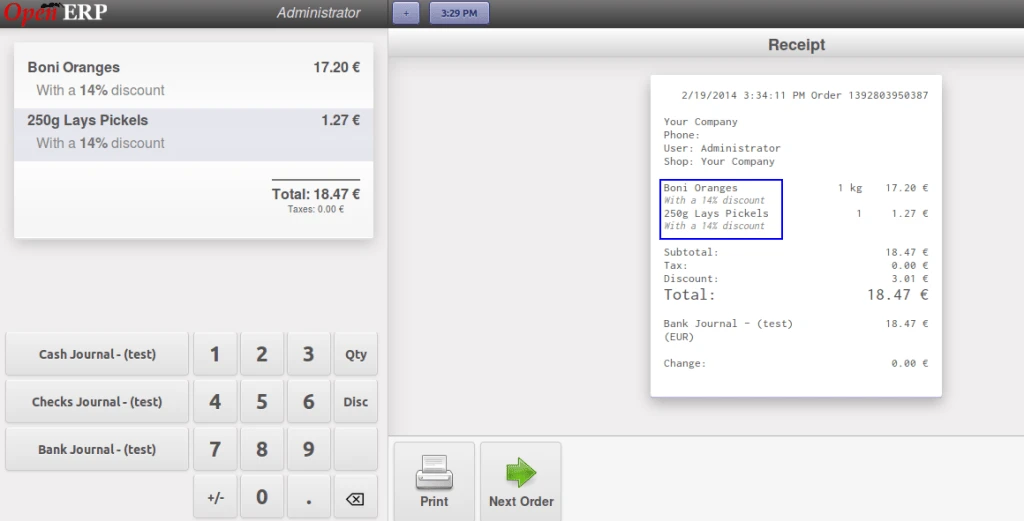
POS Receipt
And the same discount is transferred in the backend order also.
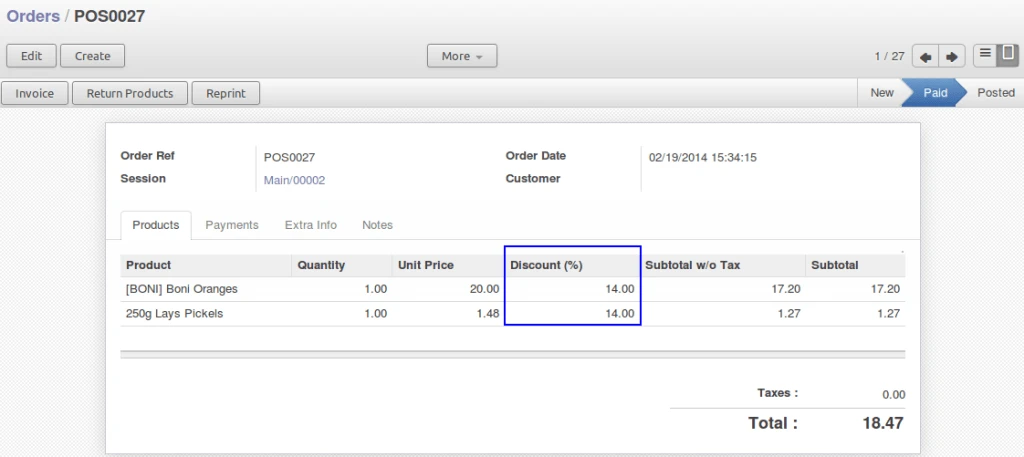
POS Order


